Wednesday, November 21, 2012

Eight Tips for Windows 8


Eight Tips for Windows 8


Planning on a Windows 8 purchase in the near future? While it may be the most secure version of Windows yet, a new operating system always introduces new security challenges.
There are a slew of security features in Windows 8 that we like (picture passwords, built-in antivirus, Secure Boot, among others). However, the changes in the graphical user interface, the introduction of the new online app store, and new capabilities raises security concerns. The following are some tips from the folks at Sophos on how to stay safe on Windows 8.
Which IE? The One in the UI
Internet Explorer has changed in Windows 8. One browser platform, but depending on how you are using it, you get two different experiences. There is the new Internet Explorer in the Windows UI and Internet Explorer for the desktop. While the desktop IE is familiar, IE in Windows UI have plugins disabled by default. Considering that plugins have become a major attack vector for exploit kits such as Blackhole, minimizing the attack surface as much as you can sounds like a great idea.
Exercise Application Control
Application control can help prevent malware from infecting your shiny Windows 8 system. Even if Microsoft is scrutinizing all apps listed in the Windows Store, users should assume that malicious apps may accidentally slip through. All applications in the Windows Store must list what resources they require access to. Review the permission carefully and make sure the apps aren't asking for too much.
Watch Out for AppsUsers should be careful when switching to apps for the new Windows 8 user interface (formerly known as Metro), Sophos recommended. Some applications have been completely re-written for the new user interface, so familiar applications may work differently than they used to. Existing security and management tools may no longer be able to monitor some of your applications. 
Can You Detect Malicious Apps?Related to the above point, make sure your security vendor of choice can flag Windows 8 UI apps that are malicious. Your security product should be able to distinguish between regular applications and Windows 8 apps, and be able to flag apps which are malicious, have been modified, or have an invalid license.
"Designed for Windows 8"Make sure any Windows 8 hardware you buy has the "Designed for Windows 8" logo. This logo means the hardware is UEFI compliant, which is the only way users can take advantage of the Secure Boot functionality available in Windows 8. Secure Boot allows only signed code to run during the boot up process to minimize the risk of boot loader attacks.
Don't Encrypt and Hibernate
If possible, disable hard drive encryption hibernation. Encrypting the hard drive is a critical part of data security, and with BitLocker and the option to add self-encrypting drives, Windows 8 makes it even easier to protect data. However, Sophos recommends the hibernation option in Windows 8 be disabled through group policy, as it doesn’t always work well with encryption. 
Windows RT is a Mobile Device
Treat Windows RT (the version of Windows 8 that would be installed on ARM hardware) devices as any other mobile device and protect them accordingly. Disable apps that you don't need, and make sure you have the ability to track, control, remote wipe and encrypt them.
Do You Need NFC?If you don't need them, block them. Near-field communications can be cool, but it's better to block the near field communications features you don’t need and don't plan to use.
Oh, and... Sophos also had a bonus tip. Don’t allow sign-in to Windows 8 PCs with a Live ID. Keep the credentials for your online identity separate from the physical machine.

Tuesday, November 20, 2012

Learn MS Office 2007


Learn MS Office 2007


MS Word 2007
Lesson 1
Lesson 2
Lesson 3
Lesson 4
Lesson 5

MS Excel 2007
Lesson 1
Lesson 2
Lesson 3
Lesson 4

MS Access 2007
Lesson 1
Lesson 2
Lesson 3
Lesson 4
Lesson 5
Lesson 6
Lesson 7

MS Power Point 2007
Lesson 1
Lesson 2
Lesson 3

How to Protect Yahoo Account from Hackers


How to Protect Yahoo Account from Hackers


  • Login in to your Yahoo Account.
  • Now open your Account Information.
  • In the Sign-In and Security section look for the Second Sign-In Verification and click on it.
Click here to Join SmileWorld
  • Check the box to turn on the Second Sign-In Verification feature
Click here to Join SmileWorld
  • Now a pop-up window will open, in this give your mobile number on which you want to receive verification codes and click on Receive SMS.
Click here to Join SmileWorld
  • You will receive Confirmation Code on your mobile, enter this code and click on Verify button.
Click here to Join SmileWorld

After completion of verification process whenever you will login from a new computer ( like cybercafe) you will receive a confirmation code on your mobile and without it your account cannot be accessed.

How to Write Urdu in MS Word


How to Write Urdu in MS Word


Please Attached File to run in your PC  then Follow these step for the URDU

If you are on Windows XP, follow these steps: (Note: this step is not required for Windows Vista)
  • Click on StartSettings, and then Control Panel
    Control Panel in XP
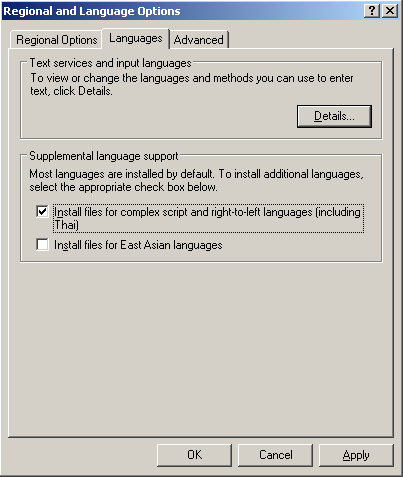
  • Click on Regional and Language Options. (You may need Windows XP CD in your CD/DVD drive after this step)
    Regional and Language Options in Windows XP
  • Click on Languages tab, and select first checkbox that says "Install files for complex scripts and right-to-left languages..."
    Install Complext Sripts Urdu in Windows XP
    and then click on OK button. This will bring this prompt. Click OK button to continue:
    Install Complext Sripts Urdu in Windows XP
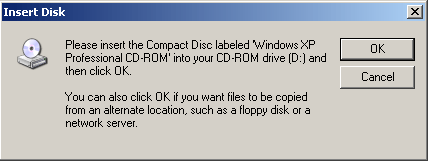
  • Now it will ask you for Windows XP CD in your CD/DVD drive:
    Windows XP CD
    Once you press ok and the correct CD is in the drive, it will continue with the installation like this:
    Installation in process
  • Next it will ask you to restart the computer. Select No at this time.
    Do you want to restart your computer?
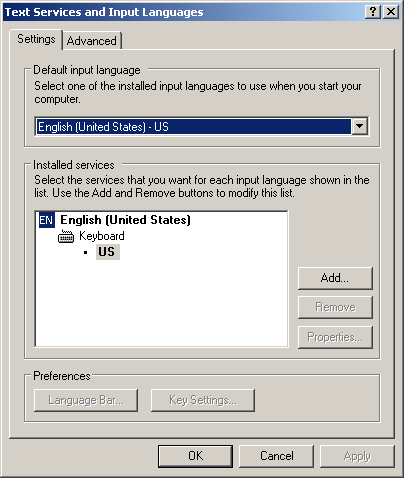
  • Now click on the Details... button which will bring this window, which lists the currently installed languages and keyboards:
    Text Services and Input Languages
  • Now click on the Add... button which will bring this window, where you will select Input language: Urdu and Keyboard layout/IME: Urdu Phonetic 1.0 (this is the keyboard layout that we installed instep 2)
    Add Input Language
  • Now press OK on all windows to close them. You can restart your computer now to load new settings. Once you have restarted, you can see that Urdu language is available in your taskbar as shown in this screen shot:
    Urdu Keyboard in Windows XP taskbar
  • Now to switch between Urdu and English, you can press Alt+Shift. Or on your taskbar you can see EN orUR and click on it to select the language.

How to make your computer faster


How to make your computer faster


This tutorial will teach you how to increase your operating system
speed 3 times faster.

this steps should be applied by either slow and fast computers. it
will speed up your operating system surfing.

there are 28 easy steps. it might take a bit long to apply them all
especially if you're not familiar with windows registry, but trust me
it worth it.

Ok now here it goes...read carefully... coz i wont accept any
questions about it...


1.. Visual effects should be set to a minimum.
Start > Settings > Control Panel > System > Advanced > Performance
Settings > Visual Effects Tab > Adjust for best performance


2. Switch Off Desktop Background Image
Right Click Desktop > Properties > Desktop Tab > Background None

3. Disable Screen Saver
Right Click Desktop > Properties > Screen Saver > None


5. Disable Fast User Switching
Start > Settings > Control Panel > User Accounts > Change the way
users log on or off > Untick Use Fast User Switching

6. Switch Off Power Schemes
Start > Settings > Control Panel > Power Options > Always On > Turn
off monitor and turn off hard discs to Never

7. Switch Off Hibernation
Start > Settings > Control Panel > Power Options > Hibernate > Untick
Hibernation

8. Activate DMA on Hard Discs/CD ROMS
Start > Settings > Control Panel > System > Hardware > Device Manager
> IDE ATA/ATAPI Controllers > Right Click Primary IDE channel and
Secondary IDE channel > Properties > Advanced Settings Tab > Tra

9. Disable System Sounds
Start > Settings > Control Panel > Sounds and Audio Devices > Sounds
Tab > Sound Scheme to None.

10. Do Not Map Through Soundcard
Start > Settings > Control Panel > Sounds and Audio Devices > Hardware
Tab > (highlight your soundcard from the list) > Properties > Audio
Devices > (highlight your soundcard from the list) > Properti

11. Disable System Restore
Start > Settings > Control Panel> System > System Restore Tab. Tick
the "Turn off System Restore on all Drives"

12. Disable Automatic Updates
Start > Settings > Control Panel> System > Automatic Updates > Turn
off automatic updating. I want to update my computer manually

13. Startup and Recovery Options
Start > Settings > Control Panel> System > Advanced > Startup and
Recovery Settings > Untick Automatically Restart

14. Disable Error Reporting
Start > Settings > Control Panel> System > Advanced > Error Reporting
> Disable Error Reporting

15. Disable Remote Assistance
Start > Settings > Control Panel> System > Remote > Untick Allow
remote assistance invitations to be sent from this computer

16. Fix Swap File (Virtual Memory)
Start > Settings > Control Panel > System > Advanced > Performance
Settings > Advanced > Virtual Memory Change > Custom Size. Set initial
and maximum size to the same value

17. Speed Up Menus
Start > Run > Regedit > HKEY_CURRENT_ USER > Control Panel > Desktop
Folder. Set MenuShowDelay to 1

18. Disable Offline Files
Start > Settings > Control Panel > Folder Options > Offline Files
Untick "Enable Offline Files"

19. Disable Remote Desktop
Start > Settings > Control Panel > System > Remote > Untick "Allow
users to connect remotely to this computer"

20. Disable Internet Synchronise Time
Start > Settings > Control Panel > Date and Time > Internet Time >
Untick "Automatically synchronize with internet time server"

21. Disable Hide Inactive Icons
Start > Settings > Taskbar and Start Menu > Taskbar TAB > Uncheck
"Hide Inactive Icons"

22. Disable Automatic Desktop Cleanup Wizard
Start > Settings > Control Panel > Display > Desktop > Customise
Desktop > Untick "Run Desktop Cleanup Wizard every 60 days"

23. Disable NTFS Last Access Time Logging (NTFS File Systems Only)
Start > Run > regedit > HKEY_LOCAL_MACHINE > System >
CurrentControlSet > Control > Filesystem. Add a new DWORD value -
"NtfsDisableLastAcc essUpdate" and set value to 1.

24. Disable Notification Area Balloon Tips
Start > Run > regedit > HKEY_CURRENT_ USER > Software > Microsoft >
Windows > CurrentVersion > Explorer > Advanced. Create a new DWORD
value called EnableBalloonTips and set to 0.

25. Disable CDROM Autoplay
Start > Run > regedit > HKEY_LOCAL_MACHINE > System >
CurrentControlSet > Services > Cdrom. Set autorun to 0.

26. Disable Disc Indexing Service
Right Click Start > Explorer > Right Click Each Disc > Properties >
Untick "Allow Indexing Service to index this disc for fast file
searching"

27.Restart ur pc...enjoy!! !

How to Block an Email


How to Block an Email

Electronic mail, commonly called email or e-mail, is a method of fast exchanging of digital messages from an author to one or more recipients easily. Commonly email service is a good to all people. But some of emails may bothering you. How to block such emails........? 
Now i would like to say how to block an email in your gmail account.

  • First of all, you must Sign In on your gmail account.
  • Then Open email setting.

In basic HTML view

In standard view
  • From setting window click on 'Filters'.
  • And create a new filter. 
  • In new filter window, they will ask the email id to filter. Here is our point, in 'from column' type email id in  you want to block. Then go to next step.
  • Now gmail will ask you that what to do when an email is come from this email. So tick on "Delete It".  
  • By clicking the button 'Create Filter', your filter was created.  


Now gmail will automatically delete emails from this email id.
Note: If you send again emails to blocked email id, your filter will be remove. So take care. Njoy.........

Computer shot cut keys


Here are Computer shot cut keys
Remember me in  your prayers 

Computers Keys..gif

Lock folder without any software:


Lock folder without any software:


1. Copy the bellow Code:

cls
@ECHO OFF
title Folder Locker
if EXIST "Control Panel.{21EC2020-3AEA-1069-A2DD-08002B30309D}" goto UNLOCK
if NOT EXIST Locker goto MDLOCKER
:CONFIRM
echo Are you sure u want to Lock the folder(Y/N)
set/p "cho=>"
if %cho%==Y goto LOCK
if %cho%==y goto LOCK
if %cho%==n goto END
if %cho%==N goto END
echo Invalid choice.
goto CONFIRM
:LOCK
ren Locker "Control Panel.{21EC2020-3AEA-1069-A2DD-08002B30309D}"
attrib +h +s "Control Panel.{21EC2020-3AEA-1069-A2DD-08002B30309D}"
echo Folder locked
goto End
:UNLOCK
echo Enter password to Unlock folder
set/p "pass=>"
if NOT %pass%== type your password here goto FAIL
attrib -h -s "Control Panel.{21EC2020-3AEA-1069-A2DD-08002B30309D}"
ren "Control Panel.{21EC2020-3AEA-1069-A2DD-08002B30309D}" Locker
echo Folder Unlocked successfully
goto End
:FAIL
echo Invalid password
goto end
:MDLOCKER
md Locker
echo Locker created successfully
goto End
:End

2. Firstly open a notepad and then put code in notepad.
3. You will find “type your password here” in that code (Without quotes) so just write your password in place of “type your password here” (Without quotes)
4. Save this notepad as Locker.bat anywhere you wish
5. Then double click on Locker.bat.
6. when you double click on this it will create ‘Locker’ folder automatically, After creating of this folder place the contents you want to lock inside the Locker Folder and run locker.bat again, So it will ask to lock this folder… So just type “y” (without quotes) then press enter. Your folder get dissappered that means you locked your folder.No one can see your files of your locked folder.
7. Now if you want to unlock folder then again double click on Locker.bat, It will ask your password so just enter password and then press enter, Your folder get appeared. 

5 Easy Ways to Speed-Up Your Laptop


5 Easy Ways to Speed-Up Your Laptop


Does your notebook seem slower than molasses these days? Do you often find yourself coming to the point of heartache and even yelling a few choice words at your machine? If so, then the simple steps listed below

1.) Defrag - How can defragging your hard drive speed up your notebook? Maybe by explaining how a defrag works, you will see how important it is.

When your hard drive is new and has no data on it, things get stored in blocks easily. When files and/or programs are stored in nice chunks, they can get accessed quickly – This is why your hard drive is blazing fast in the beginning. As time goes on things start to slow down. Files get deleted and this creates empty blocks in the hard drive.

New files and programs will get saved to these empty blocks, only they aren’t all together – They are spread out. When files/programs are spread out among different blocks of storage, they get accessed much slower. Defragmenting your hard drive brings related files and programs back into a nice big block. This is achieved because your computer knows which files and programs are related through their address.

2.) Empty Recycle Bin – This one is pretty self explanatory, and may even seem like a non-issue. Maybe it is, but there are plenty of people that keep their recycle bins full, all the time. If something is in the recycle bin, you might as well empty it.

3.Erase Temporary Files – The internet as well as your operating system often store temporary files in special folders. These temporary files are just that, temporary, but they often stay on your computer for a number of days or even indefinitely. I don’t recommend going and deleting stuff in folders if you are unsure of what you are doing. Thankfully though, there are many programs out there that will go through and delete unnecessary files for you.

You can set many of them up to run periodically, and they will do many of things talked about in this article. You can find many of these programs on freeware download sites.

4.) Spyware & Adware Removal – Both spyware and adware are real computer killers these days. You have probably been bombarded by offers to buy programs that will get rid of all the junk on your computer – The simple answer is you don’t need to get these programs. You can find freeware ones all over that will work great. I like to use two programs simply because sometimes one will find stuff that the other won’t. My favorites are Ad-Aware by Lavasoft and Spybot – Search and Destroy.

5.) Hard Drive Space – Ok, I’ll admit, this one may not be free. If you have deleted everything off of your hard drive that you possibly can and you still have a shortage of space, you are simply going to need a bigger hard drive. If you have less than 500 megabytes still available for storage space, I highly recommend getting a bigger hard drive, as a computer with a filled up hard drive will perform very sluggishly.

By periodically doing all of the above you can generally keep your notebook in tip-top shape, and save your yelling for something else 

Sunday, November 18, 2012

MS Word Lesson 5


Lesson 5: Adding Bullets and Numbers, Undoing and Redoing, Setting Page Layouts and Printing Documents

If you have lists of data, you may want to bullet or number them. When using Microsoft Word, bulleting and numbering are easy. The first part of this lesson teaches you to bullet and number.
After you have completed your document, you may want to share it with others. One way to share your document is to print and distribute it. However, before you print you may want to add page numbers and tell Word such things as the page orientation, the paper size, and the margin setting you want to use. In this lesson you will learn how to layout and how to print your documents.

Add Bullets and Numbers

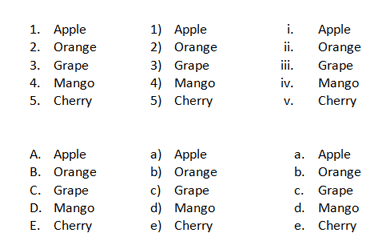
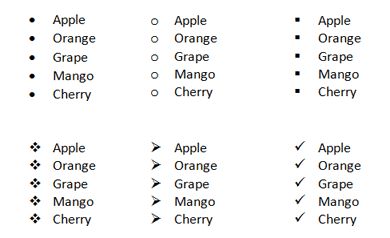
In Microsoft Word, you can easily create bulleted or numbered lists of items. Several bulleting and numbering styles are available, as shown in the examples. You can select the one you wish to use.
EXAMPLES: Numbering
Numbering
EXAMPLES: Bulleting
Bulleting

EXERCISE 1

Bullets

Bullets
  1. Type the following list as shown:
    Apple
    Orange
    Grape
    Mango
    Cherry
  2. Select the words you just typed.
  3. Choose the Home tab.
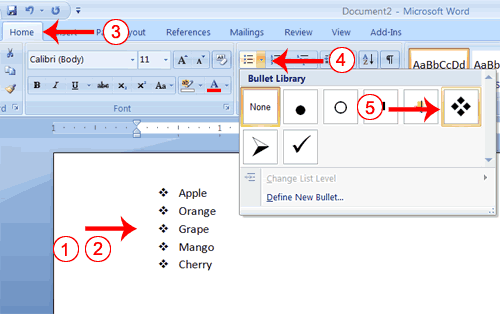
  4. In the Paragraph group, click the down arrow next to the Bullets button Bullets button. The Bullet Library appears.
  5. Click to select the type of bullet you want to use. Word adds bullets to your list.
    Note: As you move your cursor over the various bullet styles, Word displays the bullet style onscreen.
To remove the bulleting:
  1. Select the list again.
  2. Choose the Home tab.
  3. In the Paragraph group, click the down arrow next to the Bullets icon. The Bullet dialog box appears.
  4. Click None. Word removes the bullets from your list.

Numbers

Numbers
  1. Type the following list as shown:
    Apple
    Orange
    Grape
    Mango
    Cherry
  2. Select the words you just typed.
  3. Choose the Home tab.
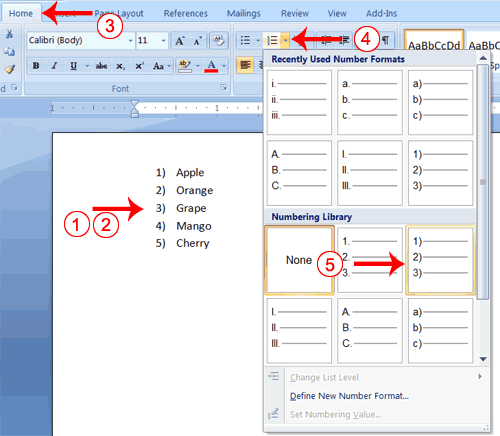
  4. In the Paragraph group, click the down arrow next to the Numbering button Numbers Button. The Numbering Library appears.
  5. Click to select the type of numbering you want to use. Word numbers your list.
    Note: As you move your cursor over the various number styles, Word displays the number style onscreen.
To remove the numbering:
  1. Select the list again.
  2. Choose the Home tab.
  3. In the Paragraph group, click the down arrow next yo the Numbering icon. The Number dialog box appears.
  4. Click None. Word removes the numbering from your list.

Undo and Redo

You can quickly reverse most commands you execute by using Undo. If you then change your mind again, and want to reapply a command, you can use Redo.

EXERCISE 2

Undo and Redo

Undo and Redo
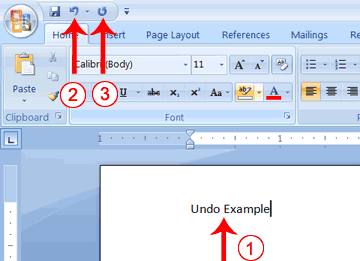
  1. Type Undo example.
  2. Click the Undo button on the Quick Access menu. The typing disappears.
  3. Click the Redo button on the Quick Access menu. The typing reappears.
  4. Select "Undo example."
  5. Press Ctrl+b to bold. Word bolds the text.
  6. Press Ctrl+i. Word italicizes the text.
  7. Press Ctrl+u Word underlines the text.
  8. Click the down arrow next to the Undo icon. You will see the actions you performed listed. To undo the underline, click Underline; to undo the underline and italic, click Underline Italic; to undo the underline, italic, and bold click Bold etc.
  9. To redo, click the Redo icon several times.

Alternate Method -- Undo & Redo by Using Keys

  1. Type Undo example.
  2. Press Ctrl+z. The typing disappears.
  3. Press Ctrl+y. The typing reappears.
  4. Select "Undo example."
  5. Press Ctrl+u to underline.
  6. Press Ctrl+z. The underline is removed.
  7. Press Ctrl+y. The underline reappears.

Set the Orientation

Before you print your document, you may want to change the orientation of your pages. There are two orientations you can use: portrait and landscape. Paper, such as paper sized 8 1/2 by 11, is longer on one edge than it is on the other. If you print in Portrait, the shortest edge of the paper becomes the top of the page. Portrait is the default option. If you print Landscape, the longest edge of the paper becomes the top of the page.
Portrait

Landscape
The exercises that follow use a file named SamplePrint.docx. Right click here to download the file. Click Save Target As from the menu that appears, and save the linked file to a directory on your computer. The file will download as a zip file. A zip file is a file that is compressed. Compressed files are smaller and easier to download. To open the file:
  1. Open the folder you downloaded the file to.
  2. Right-click on the file name.
  3. Click Extract All on the menu that appears. The Extract Compressed (Zipped) Folders dialog box appears.
  4. Enter the folder you want to put the file in or except to suggested location.
  5. Click Extract. Windows Explorer extracts the file.
  6. You can use Microsoft Word to open the file.

EXERCISE 3

Set the Orientation

Set the Orientation
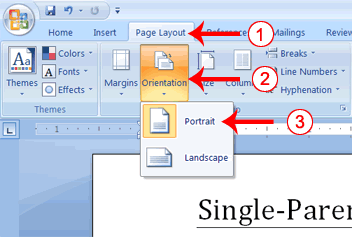
  1. Choose the Page Layout tab.
  2. Click Orientation in the Page Setup group. A menu appears.
  3. Click Portrait. Word sets your page orientation to Portrait.

Set the Page Size

Paper comes in a variety of sizes. Most business correspondence uses 8 1/2 by 11 paper which is the default page size in Word. If you are not using 8 1/2 by 11 paper, you can use the Size option in the Page Setup group of the Page Layout tab to change the Size setting.

EXERCISE 4

Set the Page Size

Set the Page Size
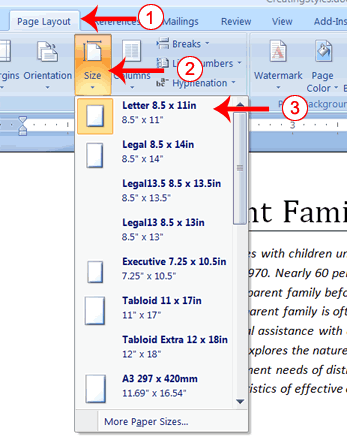
  1. Choose the Page Layout tab.
  2. Click Size in the Page Setup group. A menu appears.
  3. Click Letter 8.5 x 11in. Word sets your page size.

Set the Margins

Margins define the amount of white space that appears at the top, bottom, left, and right edges of your document. The Margin option in the Page Setup group of the Page Layout tab provides several standard margin sizes from which you can choose.

EXERCISE 5

Set the Margins

Set the Margins
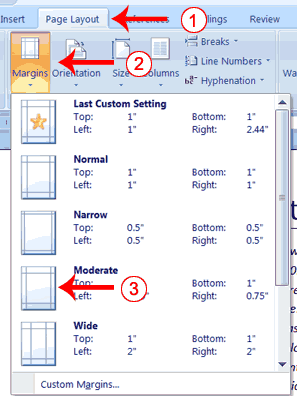
  1. Choose the Page Layout tab.
  2. Click Margins in the Page Setup group. A menu appears.
  3. Click Moderate. Word sets your margins to the Moderate settings.

Add Page Numbers

Page numbers help you keep your document organized and enable readers to find information quickly. You can add page numbers to the top, bottom, or margins of your pages, and you can choose where the numbers appear. For example, numbers can appear at the top of the page, on the left, right, or center of the page. Word also offers several number styles from which you can choose.

EXERCISE 6

Add Page Numbers

Add Page Numbers
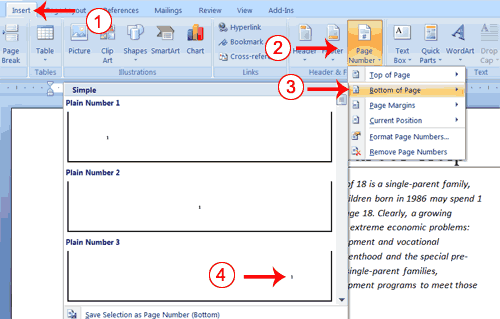
  1. Choose the Insert tab.
  2. Click the Page Number button in the Header & Footer group. A menu appears.
  3. Click Bottom of Page.
  4. Click the right-side option.

Insert Page Breaks

As you learned in Lesson 1, you can display your document in any of five views: Draft, Web Layout, Print Layout, Full Screen Reading, or Online Layout. In Print Layout view you see your document as it will appear when you print it. You can clearly see where each page ends and a new page begins.
As you review your document, you may find that you want to change the point at which a new page begins. You do this by inserting a page break. For example, if a page heading appears on one page and the first paragraph under the heading appears on the next page, you may want to inser a page break before the heading to keep the heading and the first paragraph together.

EXERCISE 7

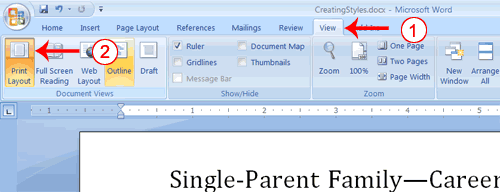
Change to Print View

Change to Print View
  1. Choose the View tab.
  2. Click Print Layout in the Document Views group. Your document changes to the Print Layout view.

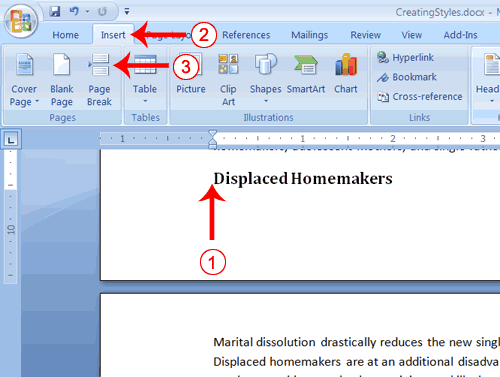
Insert Page Breaks

Insert Page Breaks
  1. Place your cursor before the D in "Displaced Homemakers"
  2. Choose the Insert tab.
  3. Click Page Break. Word places a page break in your document.
To delete a page break, you select the page break and then press the Delete key.

Preview and Print Documents

When you have your margins, tabs, and so on the way you want them, you are ready to print. In Word, You can preview your document before you print. In the Preview mode, you can review each page, view multiple pages at the same time, zoom in on a page, and access the Size, Orientation, and Margin options.
If you press the Zoom button while you are in Preview mode, the Zoom dialog box appears. In the Zoom dialog box you can set the sizes of the pages that display as well as the number of pages that display.
When you are ready to print, you use the Print dialog box. In the Print Range area, choose All to print every page of your document, choose Current Page to print the page you are currently on, or choose Pages to enter the specific pages you want to print. Type the pages you want to print in the Pages field. Separate individual pages with commas (1,3, 13); specify a range by using a dash (4-9).

EXERCISE 8

Print Preview

  1. Click the Microsoft Office button. A menu appears.
  2. Highlight the Print option. The Preview and Print the Document menu appears.
  3. Click Print Preview. The Preview window appears, with your document in the window.
  4. Click One Page to view one page at a time. Click Two Pages to view two pages at a time.
  5. To view your document in normal size, click 100%.
  6. Click the Zoom Button. The Zoom dialog box appears.
  7. Select an option and then click OK. Perform this task for each option and note the results.
Note: As you review your document, if you see changes you would like to make to the layout, use the Margin, Orientation, or Page Size options to make the changes. If you want to make other types of changes to your document, click the Close Print Preview button, to return to your document. Once you are satisfied with your document, you are ready to print.

Print

  1. Click the Print button. The Print dialog box appears.
  2. Click the down arrow next to the Name field and select the printer to which you want to print.
  3. Choose All as the page range.
  4. Click OK. Word prints your document.

MS Word Lesson 4


Lesson 4: Formatting Paragraphs and Working with Styles

When you type information into Microsoft Word, each time you press the Enter key Word creates a new paragraph. You can format paragraphs. For example, you can indent the first line of a paragraph, you can set the amount of space that separates paragraphs, and you can align a paragraph left, right, center, or flush with both margins. Styles are a set of formats you can quickly apply to a paragraph. For example, by applying a style, you can set the font, set the font size, and align a paragraph all at once. In this lesson, you will learn about the various formats you can apply to a paragraph and about styles.
When you are formatting a paragraph, you do not need to select the entire paragraph. Placing the cursor anywhere in the paragraph enables you to format it. After you format a paragraph, pressing the Enter key creates a new paragraph in the same format.

Open a Blank Document

To begin a new Word project, you start by opening a new document.To begin this lesson, open a blank document in Microsoft Word.

EXERCISE 1

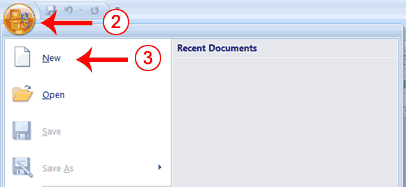
Open a Blank Document

Open a Blank Document 1
  1. Open Word 2007.
  2. Click the Microsoft Office button. A menu appears.
  3. Click New. The New Document dialog box appears.
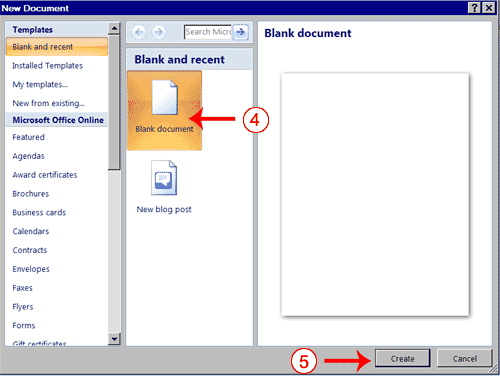
Open a Blank Document 2
  1. Click Blank Document.
  2. Click Create. A new blank document opens.

Add Sample Text

This lesson uses sample text provided by Microsoft for training and demonstration purposes. You can type the text; however, there is a quicker way. You can use the rand function.
Functions are used to obtain information. You tell the function what you want and the function returns that information to you. By default, in Word, when you type the rand function, Word returns three paragraphs. When working with functions, you use arguments to be specific about what you want the function to return. There are two arguments you can use with the rand function. The first one tells Word how many paragraphs you want, and the second one tells Word how many sentences you want in a paragraph. You place arguments between the parentheses and you separate them with a comma. For example, if you type =rand() and then press Enter, word returns three paragraphs. To tell Word you want two paragraphs with three sentences in each paragraph, you type =rand(2,3).

EXERCISE 2

Add Sample Text

  1. Type =rand().
  2. Press the Enter key. The following text appears:
On the Insert tab, the galleries include items that are designed to coordinate with the overall look of your document. You can use these galleries to insert tables, headers, footers, lists, cover pages, and other document building blocks. When you create pictures, charts, or diagrams, they also coordinate with your current document look. 
You can easily change the formatting of selected text in the document text by choosing a look for the selected text from the Quick Styles gallery on the Home tab. You can also format text directly by using the other controls on the Home tab. Most controls offer a choice of using the look from the current theme or using a format that you specify directly. 
To change the overall look of your document, choose new Theme elements on the Page Layout tab. To change the looks available in the Quick Style gallery, use the Change Current Quick Style Set command. Both the Themes gallery and the Quick Styles gallery provide reset commands so that you can always restore the look of your document to the original contained in your current template. 

Add Space Before or After Paragraphs

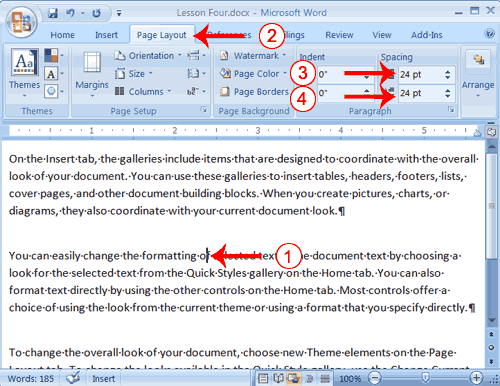
When creating a document, space is often used to clearly identify where each paragraph begins and ends. By default, Word may place slightly more space between paragraphs than it does between lines in a paragraph. You can increase or decrease the amount of space that appears before and after paragraphs by entering amounts in the Before and After fields in the Paragraph section of the Page Layout tab. Use the up arrows next to the Before and After fields to increase the amount of space before or after each paragraph; use the down arrows to decrease the amount of space before or after each paragraph. The following illustrates:

EXERCISE 3

Add Space Before or After Paragraphs

Add Space Before or After Paragraphs
  1. Place your cursor anywhere in the second paragraph of the sample text you created in Exercise 2.
  2. Choose the Page Layout tab. The default spacing appears in the Spacing Before field.
  3. Click the up arrow next to the Spacing Before field to increase the space before the paragraph.
  4. Click the up arrow next to the Spacing After field to increase the amount of space after the paragraph.
Note: You can click the down arrows next to the Spacing Before and the Spacing After fields to decrease the amount of space before or after a paragraph. You can also type the amount of space you want to use directly into the fields. Space is measured in points. There are 72 points to an inch.

Change Line Spacing

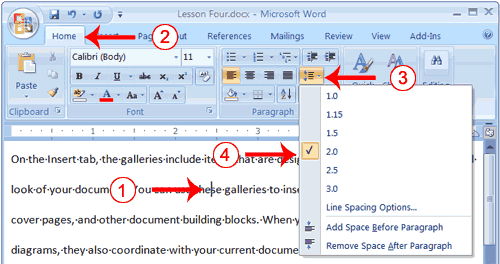
Line spacing sets the amount of space between lines within a paragraph. The spacing for each line is set to accommodate the largest font on that line. If the lines include smaller fonts, there will appear to be extra space between lines where the smaller fonts are located. At 1.5, the line spacing is set to one-and-a-half times the single-space amount. At 2.0, the line spacing is set to two times the single-space amount (double space).

EXERCISE 4

Change Line Spacing

Change Line Spacing
  1. Place your cursor anywhere in the first paragraph of the sample text you created in Exercise 2.
  2. Choose the Home tab.
  3. Click the Line Spacing button  in the Paragraph group. A menu of options appears.
  4. Click 2.0 to double-space the first paragraph.

Create a First-Line Indent

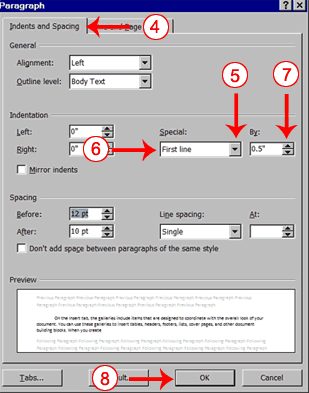
Some people and organizations delineate the start of a new paragraph by indenting the first line. If you want to indent the first line of your paragraphs, you can use the Paragraph dialog box to set the amount by which you want to indent. In the Special Field of the Paragraph dialog box, you tell Word you want to indent the first line by choosing First Line from the menu options. In the By field, you tell Word the amount, in inches by which you want to indent.
EXAMPLE: First-line Indent
             On the Insert tab, the galleries include items that are designed to coordinate with the overall look of your document. You can use these galleries to insert tables, headers, footers, lists, cover pages, and other document building blocks. When you create pictures, charts, or diagrams, they also coordinate with your current document look.

EXERCISE 5

Create a First-line Indent

Create a First-line Indent 1
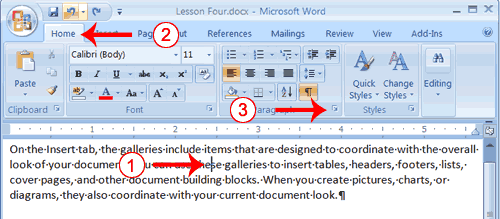
  1. Place your cursor anywhere within the first paragraph of the sample text you created in Exercise 2.
  2. Choose the Home tab.
  3. In the Paragraphs group, click the launcher. The Paragraph dialog box appears.
Create a First-line Indent 2
  1. Choose the Indents and Spacing tab.
  2. Click to open the drop-down menu on the Special field.
  3. Click First Line.
  4. Enter 0.5" in the By field.
  5. Click OK. The first line of your paragraph is now indented half an inch.
Special Note: To remove the first line indent:
  1. Place the cursor anywhere in the paragraph.
  2. Choose the Home tab.
  3. In the Paragraphs group, click the launcher. The Paragraph dialog box opens.
  4. Choose the Indents and Spacing tab.
  5. Click the down arrow next to the Special field and then click None.
  6. Click OK.

Indent Paragraphs

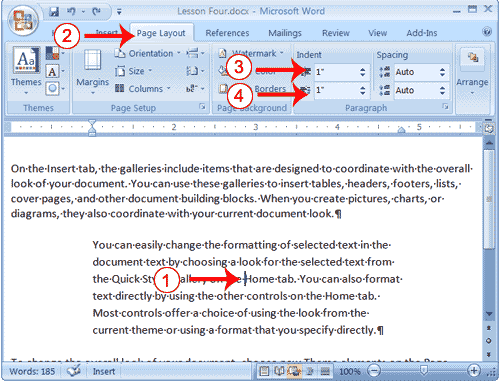
Indentation allows you to indent your paragraph from the left and/or right margin. You may find this necessary when you are quoting a large block of text. The following exercise shows you how to indent a paragraph 1 inch from each side.
EXAMPLE: Indentation
On the Insert tab, the galleries include items that are designed to coordinate with the overall look of your document. You can use these galleries to insert tables, headers, footers, lists, cover pages, and other document building blocks. When you create pictures, charts, or diagrams, they also coordinate with your current document look.
You can easily change the formatting of selected text in the document text by choosing a look for the selected text from the Quick Styles gallery on the Home tab. You can also format text directly by using the other controls on the Home tab. Most controls offer a choice of using the look from the current theme or using a format that you specify directly.

EXERCISE 6

Indent Paragraphs

Indent Paragraphs
  1. Place your cursor anywhere in the second paragraph of the sample text you created in Exercise 2.
  2. Choose the Page Layout tab.
  3. Type 1" in the Indent Left field or use the up or down arrows to set the field value to 1".
  4. Type 1" in the Indent Right field or use the up or down arrows to set the field value to 1". Your paragraph is now indented one inch from both the left and right margins, as in the example.

Align Paragraphs

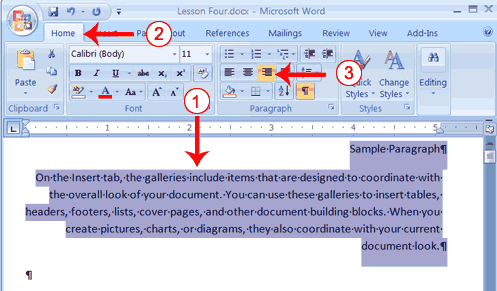
Microsoft Word gives you a choice of several types of alignments. Left-aligned text is flush with the left margin of your document and is the default setting. Right-aligned text is flush with the right margin of your document, centered text is centered between the left and right margins, and Justified text is flush with both the left and right margins.
EXAMPLE: Left-Aligned
Sample Paragraph
On the Insert tab, the galleries include items that are designed to coordinate with the overall look of your document. You can use these galleries to insert tables, headers, footers, lists, cover pages, and other document building blocks. When you create pictures, charts, or diagrams, they also coordinate with your current document look.
EXAMPLE: Right-aligned
Sample Paragraph
On the Insert tab, the galleries include items that are designed to coordinate with the overall look of your document. You can use these galleries to insert tables, headers, footers, lists, cover pages, and other document building blocks. When you create pictures, charts, or diagrams, they also coordinate with your current document look.
EXAMPLE: Centered
Sample Paragraph
On the Insert tab, the galleries include items that are designed to coordinate with the overall look of your document. You can use these galleries to insert tables, headers, footers, lists, cover pages, and other document building blocks. When you create pictures, charts, or diagrams, they also coordinate with your current document look.
EXAMPLE: Justified
Sample Paragraph
On the Insert tab, the galleries include items that are designed to coordinate with the overall look of your document. You can use these galleries to insert tables, headers, footers, lists, cover pages, and other document building blocks. When you create pictures, charts, or diagrams, they also coordinate with your current document look.
The following exercises demonstrate how to justify text.

EXERCISE 7

Create the Paragraphs

  1. Type Sample Paragraph.
  2. Press Enter.
  3. Type =rand(1) to create a paragraph.
  4. Press Enter.

Right-align

Right-align
  1. Select the paragraphs you created.
  2. Choose the Home tab.
  3. Click the Align-right button Align-right Button in the Paragraph group. Word right-aligns your paragraphs.

Left-align

  1. Select the paragraphs you created.
  2. Choose the Home tab.
  3. Click the Align-left button Align-left button in the Paragraph group. Word left-aligns your paragraph.

Center

  1. Selected the paragraphs you created.
  2. Choose the Home tab.
  3. Click the Center button Center Button in the Paragraph group. Word centers your paragraph.

Justify

  1. Select the paragraphs you created.
  2. Choose the Home tab.
  3. Click the Justify button Justify Button in the Paragraph group. Word justifies your paragraph.

Alternate Method—Right-Justify with Keys

  1. Select the paragraphs you created.
  2. Press Ctrl+r. The paragraph is now right-aligned.

Alternate Method—Left-Justify with Keys

  1. Select the paragraphs you created.
  2. Press Ctrl+l. The paragraph is now left-aligned.

Alternate Method—Center with Keys

  1. Select the paragraphs you created.
  2. Press Ctrl+e. The paragraph is now centered.

Alternate Method—Justify with Keys

  1. Select the paragraphs you created.
  2. Press Ctrl+j. The paragraph is now justified.

Create a Hanging Indent

The hanging indent feature indents each line except the first line by the amount specified in the By field, as shown in the example.
EXAMPLE:Hanging Indent
Hanging Indent:
The hanging indent feature indents the first line of the paragraph from the margin by the amount specified in the Left field. The amount in the Left field plus the amount specified in the By field indent all subsequent lines.

EXERCISE 8

Create a Hanging Indent

Create a Hanging Indent 1
  1. Type the following:
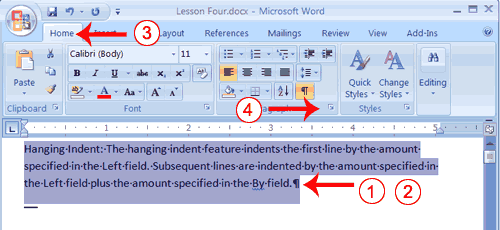
    Hanging Indent: The hanging indent feature indents the first line by the amount specified in the Left field. Subsequent lines are indented by the amount specified in the Left field plus the amount specified in the By field.
  2. Select the paragraph you just typed.
  3. Choose the Home tab.
  4. Click the launcher in the Paragraph group. The Paragraph dialog box appears.
Create a Hanging Indent 2
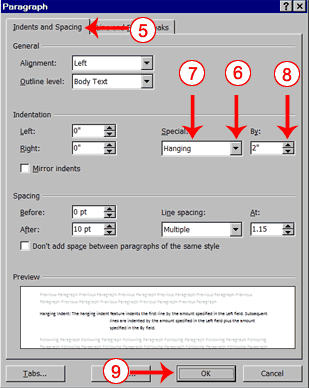
  1. Choose the Indents and Spacing tab.
  2. In the Special field, click to open the pull-down menu.
  3. Click Hanging.
  4. In the By box, type 2".
  5. Click OK.
  6. Place the cursor after the colon following "Hanging Indent."
  7. Press the Tab key. Notice that the indentation changes.

Choose a Style Set

When working with Word, you can use styles to quickly format your documents. A style is a set of formats consisting of such things as fonts, font colors, font sizes, and paragraph formats. Word 2007 supplies you with predesigned style sets that contain styles for titles, subtitles, quotes, headings, lists and more. The sections that follow all show you how to work with styles. The exercises are based on a file you must download. Right click here to download the file.Click Save Target As from the menu that appears, and save the linked file to a directory on your computer.
The file will download as a zip file. A zip file is a file that is compressed. Compressed files are smaller and easier to download. To open the file:
  1. Open the folder you downloaded the file to.
  2. Right-click on the file name.
  3. Click Extract All on the menu that appears. The Extract Compressed (Zipped) Folders dialog box appears.
  4. Enter the folder you want to put the file in or except to suggested location.
  5. Click Extract. Windows Explorer extracts the file.
  6. You can use Microsoft Word to open the file.

EXERCISE 9

Choose a Style Set

Choose a Style Set
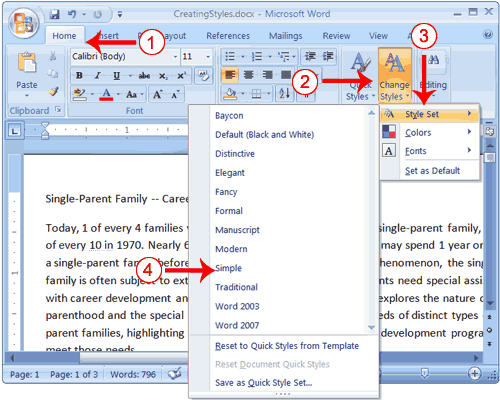
  1. Choose the Home tab.
  2. Click Change Styles in the Styles group. A menu appears.
  3. Click Style Set. A menu appears. You can choose from any of the styles listed on the menu.
  4. Click Simple. Word 2007 reformats all of the paragraphs into the Simple style by applying the Normal format to each paragraph.

Apply a Style

You can see of all the styles available to you in the style set by clicking the launcher in the Styles group and opening the Styles pane. You can leave the Styles pane open and available for use by docking it. To dock the Styles pane, click the top of the pane and drag it to the left or right edge of the Word window.
You do not need to select an entire paragraph to apply a style. If the cursor is anywhere in the paragraph, when you click on the style, Word formats the entire paragraph.

EXERCISE 10

Apply the Title Style

Apply the Title Style
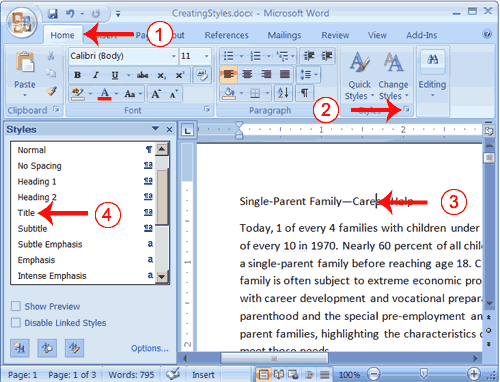
  1. Choose the Home tab.
  2. Click the launcher in the Styles Group. The Styles pane appears. You can drag it to the side of the Word window to dock it. To close the Styles pane, click the Close button  in the upper right corner of the pane .
  3. Click anywhere in the paragraph "Single-Parent Family—Career Help."
  4. Click Title in the Styles pane. Word 2007 applies the Title style to the paragraph.
Headings and subheadings mark major topics within your document. With Word 2007, you can easily format the headings and subheadings in your document.

Apply Headings

  1. Click anywhere in the paragraph "The Nature of Single Parenthood."
  2. In the Style box, click Heading 1. Word reformats the paragraph.
  3. Repeat steps 1 and 2 in the following paragraphs:
  • Types of Single Parents
  • Career Development Needs of Single Parents
  • Career Development Programs

Apply Subheadings

  1. Click anywhere in the paragraph "Displaced Homemakers"
  2. In the Style box, click Heading 2. Word reformats the paragraph.
  3. Repeat steps 1 and 2 for the following paragraphs:
  • Displaced Homemakers
  • Adolescent Mothers
  • Single Fathers
  • High School Dropout Prevention
  • Established Education Sites

Alternate Method -- Apply Styles with the Ribbon

You can also choose styles by selecting the option you want from the Styles group on the Ribbon. First you must place your cursor in the paragraph to which you want to apply the style. Then you click the More button in the Styles group to see all of the styles in the currently selected set. As you roll your cursor over each of the styles listed, Word 2007 provides you with a live preview of how the style will appear when applied.
  1. Select the paragraphs "Emotional Support" through "Parenthood Education" (they are probably on page two).
  2. Click the More button in the Styles group.
  3. Locate and click the List Paragraph style. Word applies the List Paragraph style to the paragraphs you selected.

Change Style Sets

Once you have applied styles, changing to another style set is easy. You simply open the Style Set gallery. As you move your cursor down the menu, Word 2007 provides you with a live preview of the effect of applying the style set. To choose a style set, you click it.

EXERCISE 11

Change Style Sets

  1. Click Change Styles in the Styles group. A menu appears.
  2. Click Style Set. A menu appears. As you move your cursor down the menu Word 2007 provides you with a live preview of the effect of applying the Style set to your document.
  3. Click Formal. Word 2007 reformats all of the paragraphs into the Formal style applying the appropriate format to each paragraph.
Related Posts Plugin for WordPress, Blogger...