Lesson 3: Animations, Transitions, Spell Check, Outline Tab, Slides Tab, Sorter View, and Printing
Animations control how objects move onto, off of, and around your slides. Transitions control how your presentation moves from one slide to the next. This lesson teaches you how to create animations and transitions. It also teaches how to spell-check your document, how to use the Outline and Slides tabs, how to use Sorter view, and how to print.
Add Animations
You can animate the objects on your PowerPoint slides. PowerPoint provides four types of animations: Entrance, Emphasis, Exit, and Motion Paths. An Entrance animation determines the manner in which an object appears on a slide; for example, an object can move onto a slide. An Emphasis animation does something to draw attention to an object; for example, the object can become larger. An Exit animation determines the manner in which an object leaves a slide; for example, an object can move off a slide. A Motion Paths animation determines how an object moves around a slide; for example, an object can move from left to right.
After you add an animation, you can use the Custom Animation pane to modify it by choosing an effect. Choosing an effect enables you to define what starts the animation, its properties (such the direction from which an object moves onto the slide), and control the speed of the animation. In addition, you can have an animation start when you click the mouse, start along with the previous animation, or start at a specified time after the previous animation.
If the Auto Preview box is checked on the Custom Animation pane, PowerPoint provides you with preview of your animation after you create it and each time you modify it. You can also use the Play button  on the Custom Animation pane to preview an animation.
To choose an effect:
- Select the object you want to animate.
- Choose the Animations tab.
- Click the Custom Animation button
 . The Custom Animation pane appears.
 - Click the Add Effect button
 . A menu appears.
 - Choose the type of effect you want. A submenu appears.
- Click the effect you want. PowerPoint applies the effect.
To modify an effect:
- Click the down arrow next to the Start field on the Custom Animations pane and then select the start method you want.
- Click the down arrow next to the Property field on the Custom Animations pane and the select the property you want. The Property field might be labeled Direction, Size, or some other property.
- Click the down arrow next to the Speed field on the Custom Animations pane and then select the speed you want to apply to your animation.
To preview the animation, click the Play button on the Custom Animations pane.
EXERCISE 1
Add an Animation to a Slide
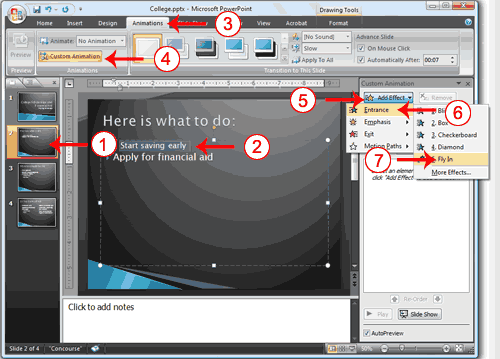
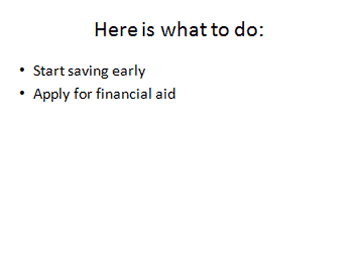
- Click Slide 2 on the Slides tab.
- Select "Start saving early."
- Choose the Animations tab.
- Click the Custom Animation button . The Custom Animation pane appears.
- Click the Add Effect button . A menu appears.
- Choose Entrance. A submenu appears.
- Click Fly In. PowerPoint applies the effect. If the Auto preview box is checked, PowerPoint automatically provides you with a preview of the animation.
Modify the Effect
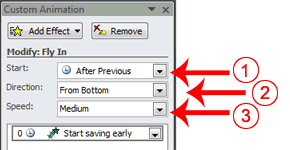
- Click the down arrow next to the Start field and then select After Previous.
- Click the down arrow next to the Direction field and then select From Bottom.
- Click the down arrow next to the Speed field and then select Medium.
Add Another Animation
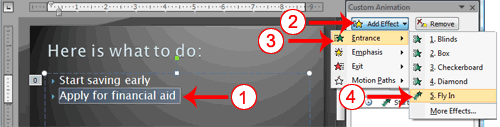
- Select "Apply for financial aid."
- Click the Add Effect button . A menu appears.
- Choose Entrance. A submenu appears.
- Click Fly In. PowerPoint applies the effect. If the Auto preview box is checked, PowerPoint automatically provides you with a preview of the animation.
Modify the Animation

- Click the down arrow next to the Start field and then select After Previous. The Apply for Financial Aid field appears in the center of the Custom Animation pane.
- Click the down arrow next to the Apply for Financial Aid field and then click Timing. The Fly In dialog box appears.
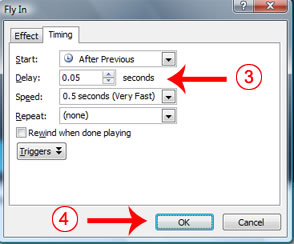
- Type 0.05 in the Delay text box.
- Click OK.
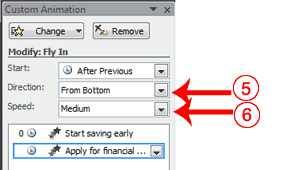
- Click the down arrow next to the Direction field and then select From Bottom.
- Click the down arrow next to the Speed field and then select Medium. If the Auto preview box is checked, PowerPoint automatically provides you with a preview of the animation. You can click the Play button on the Custom Animation pane at anytime to preview an animation.
Add Transitions
Transitions determine how your presentations move from one slide to the next. For example, a slide can move up onto the screen and replace the previous slide. PowerPoint provides several transition methods. You can add sound to a transition and you can control its speed. You can apply a transition to selected slides or to all of the slides in your presentation.
A transition can occur when the presenter clicks the mouse or after the amount of time you specify.
To apply a transition to selected slides:
- On the Slides tab, hold down the Ctrl key and then click the slides to which you want to apply the transition.
- Choose the Animations tab.
- Click the More button
 in the Transition to this Slide group. A menu of transitions appears.
 - Click the transition you want to apply. PowerPoint applies the transition. As you roll your pointer over each transition, PowerPoint provides you with a live preview of the transition.
To apply a transition to all slides:
- Choose the Animations tab.
- Click the More button in the Transition to this Slide group. A menu of transitions appears.
- Click the transition you want to apply. As you roll your pointer over each transition, PowerPoint provides you with a live preview of the transition.
- Click the Apply to All button
 in the Transition to This Slide group.
To add a sound to a transition:
- Choose the Animations tab.
- Click the down arrow next to the Transition Sound field and then click the sound you want. As you roll your pointer over each sound, PowerPoint plays the sound.
To set the speed of a transition:
- Choose the Animations tab.
- Click the down arrow next to the Transition Speed field and then click the speed you want.
If you want the transition to occur after the presenter clicks the mouse, check the On Mouse Click check box. If you want a transition to occur after a specified period of time, check the Automatically After check box and then specify the amount of time you want to elapse before the transition occurs. The On Mouse Click check box and the Automatically After check box are both located on the Animations tab in the Transition to This Slide group.
EXERCISE 2
Add Transitions
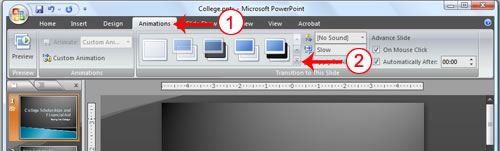
- Choose the Animations tab.
- Click the More button in the Transition to this Slide group. A menu of transitions appears.
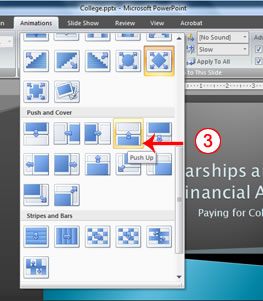 s
s- Click the Push Up transition. As you roll your pointer over each transition, PowerPoint provides you with a live preview of the transition.
Add Sound and Set the Speed

- Click the down arrow next to the Transition Sound field and then click Click.
- Click the down arrow next to the Transition Speed field and then click Slow.
Advance Slide

- Check the On Mouse Click check box.
- Click the Automatically After check box.
- Type 00:07 in the Automatically After text box.
- Click the Apply to All button . PowerPoint applies all of your changes to all of the slides.
- Click Slide 1 on the Slides tab.
- Type 00:03 in the Automatically After text box. PowerPoint changes the timing for Slide 1.
Spell Check
PowerPoint checks your spelling as you type and displays errors with a red wavy line under the misspelled word. You can right-click and then select the correct spelling from the list of offerings on the menu that appears or select Spelling to open the Spelling dialog box. If you need to, you can initiate a spell check anytime you like. To start a spell check, do one of the following:
- Press F7.
- Choose the Review tab and then click the Spelling button
 .
.
If the spell check finds a possible spelling error, the Spelling dialog box opens with the spelling error highlighted. You can respond in several ways.

| Response | Procedure |
| Do not change spelling. | Click Ignore. |
| Correct spelling. |
|
| Add to dictionary. | Click Add. |
| Word is correct. Do not change presentation. | Click Ignore All. |
| Word is incorrect. Change entire presentation. | Click Change All. |
EXERCISE 3
Spell Check
- Press F7
- Correct any spelling errors PowerPoint finds. If PowerPoint does not find any errors, the Spelling Check is Complete message box appears. Click OK.
Use the Outline and Slides Tabs
By default, the Outline and Slides tabs are located on the left side of your PowerPoint window. The Outline tab displays the text contained in your presentation. The Slides tab displays a thumbnail of all your slides. You click the thumbnail to view the slide in the Slide pane.
EXERCISE 4
Use the Outline and Slides Tabs
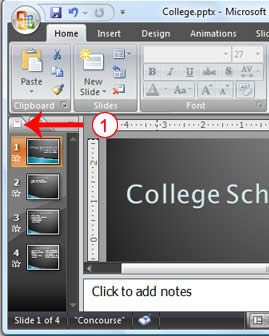
- Choose the Slides tab to view thumbnails of your slides.
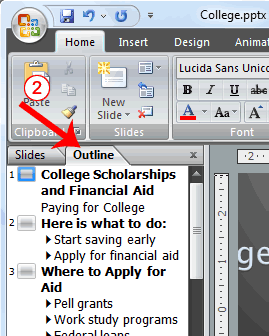
- Choose the Outline tab to view the text of your presentation as an outline.
Use Slide Sorter View
After you have created your PowerPoint slides, you can move, cut, copy, paste, duplicate, navigate, and view them in Sorter view. To view the slides in Sorter view, do one of the following:
- Choose the View tab and then click the Slide Sorter button
 in the Presentation Views group.
 - Click the Slide Sorter button
 in the bottom-right corner of the PowerPoint window.
Slide Sorter View
| |
| Task | Procedure |
| Move to first slide. | Use Ctrl+Home. |
| Move to last slide. | Use Ctrl+End. |
| Move to next slide. | Use the right arrow. |
| Move to previous slide. | Use the left arrow. |
| Select a slide. | Single-click the slide. |
| Open a slide in Normal view. | Double-click the slide. |
| Select slides. | Select a single slide:
|
Select multiple slides:
| |
| Delete a slide. |
|
| |
| Copy a slide. |
|
| |
| Paste a slide. |
|
| |
| Cut a slide. |
|
| |
| Move a slide. |
|
| Duplicate a slide. |
|
EXERCISE 5
Use Slide Sorter View
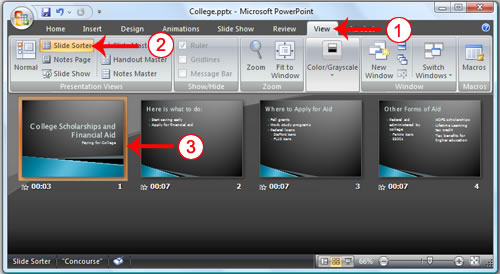
- Choose the View tab.
- Click Slide Sorter in the Presentation Views group.
- Double-click a slide to view it in Normal view.
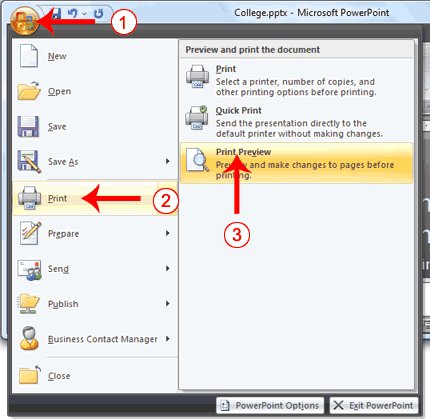
PowerPoint provides you with many printing options. You can print a large view of your slides or you can print your slides as handouts with 1, 2, 3, 4, 6, or 9 slides per page. You can also print your Notes pages or the Outline view of your slides.
To print:
- Click the Microsoft Office button. A menu appears.
- Choose Print.
- Click Print Preview.
- Click the down arrow next to the Print What field in the Page Setup group and then select what you would like to print. A preview appears onscreen.
- Click the Print . The Print dialog box appears.
- Click the down arrow next to the Color/Grayscale field to select whether you want your slides to print in color, grayscale, or black and white. If you are using a black and white printer, choose black and white. You will use less ink or toner.
- Click OK.
EXERCISE 6
Print an Outline
- Click the Microsoft Office button. A menu appears.
- Choose Print.
- Click Print Preview. The Print Preview tab appears.
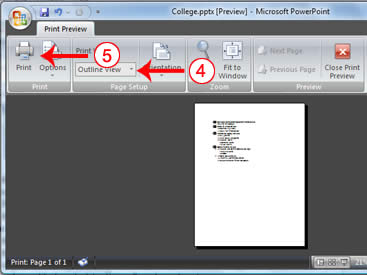
- Click the down arrow next to the Print What field in the Page Setup group and then select Outline View.
- Click the Print button
 . The Print dialog box appears.
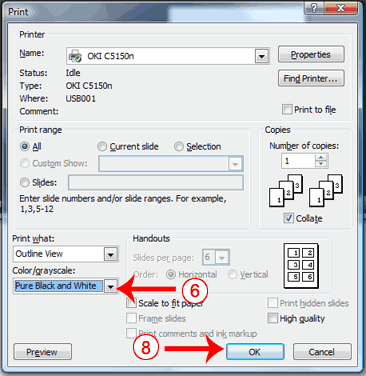
- Click the down arrow next to the Color/Grayscale field to select whether you want your slides to print in color, grayscale, or black and white. If you are using a black and white printer, choose black and white. You will use less ink or toner.
- Set the other print settings.
- Click OK. Your outline prints.
Print Your Slides
- Click the Microsoft Office button. A menu appears.
- Choose Print.
- Click Print Preview. The Print Preview tab appears.
- Click the down arrow next to the Print What field in the Page Setup group and then select Slides.
- Click the Print button . The Print dialog box appears.
- Click the down arrow next to the Color/Grayscale field to select whether you want your slides to print in color, grayscale, or black and white. If you are using a black and white printer, choose black and white. You will use less ink or toner.
- Set the other print settings.
- Click OK. Your slides print.
Print Your Slides as a Handout
- Click the Microsoft Office button. A menu appears.
- Choose Print.
- Click Print Preview. The Print Preview tab appears.
- Click the down arrow next to the Print What field in the Page Setup group and then select Handouts (4 slides per page).
- Click the Print button . The Print dialog box appears.
- Click the down arrow next to the Color/Grayscale field to select whether you want your slides to print in color, grayscale, or black and white. If you are using a black and white printer, choose black and white. You will use less ink or toner.
- Set the other print settings.
- Click OK. Your handouts print.