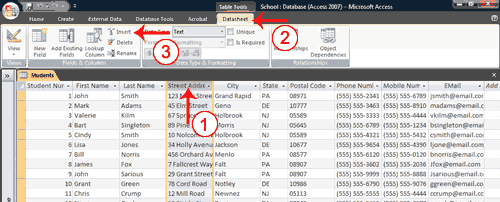
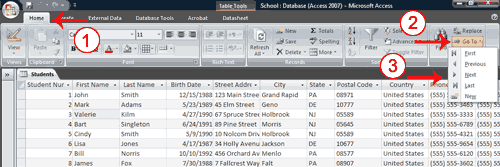
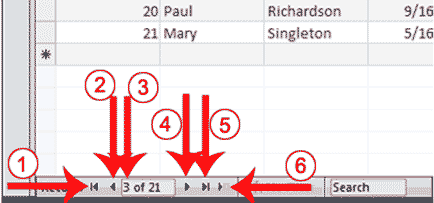
Lesson 4: Sorting, Filtering, and Creating Relationships
You can sort Access data so you can view records in the order you want to view them, and you can filter data so you only see the records you want to see. This lesson teaches you how to sort and filter an Access table.
Access data is stored in multiple tables. Relationships join tables together so you can work with the data from multiple tables. This lesson also teaches you how to create relationships.
Sort a Table
By sorting, you can put a column of information in alphabetical, numerical, or date order. You can sort in ascending order (alphabetical from A to Z, lowest number to highest number, earliest date to latest date) or descending order (alphabetical from Z to A, highest number to lowest number, latest date to earliest date). You can also sort within a sort. For example, you can sort by state and then sort within each state by city. When sorting within a sort, perform the innermost sort first. For example, if you are sorting by state and then city, sort the city first and then sort by state.
To add a sort:
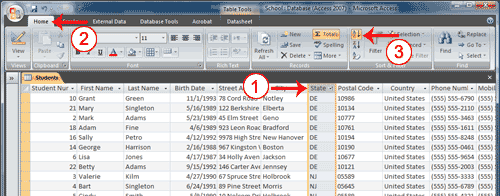 |
- Click the column label for the column you want to sort.
- Activate the Home tab.
- Click the Ascending
 or Descending
  button in the Sort & Filter group. Access sorts the column in ascending or descending order.
To remove a sort:
- Activate the Home tab.
- Click the Clear All Sorts
 button in the Sort & Filter group. Access clears all of the sorts you have applied.
Filter a Table
You can apply a filter to see only the records you want to see. For example, perhaps your database contains students from the states of DE, NJ, and PA and you only want to see the students from DE. You can filter your data so only DE students display.
Each time you apply a filter to a column, it replaces any previous filter you applied to that column. For example, if you apply a filter so you only see students in DE, and later you apply a filter so you only see students in NJ, Access clears the DE filter and then applies the NJ filter.
You can apply filters to multiple columns in the same table. For example, by applying a filter first to the State field and then to the Last Name field, you can see all of the students in the state of DE whose last names are Adams.
To apply a filter:
 |  |
 |  |
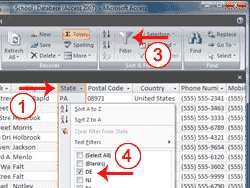
- Click the column label for the column you want to filter.
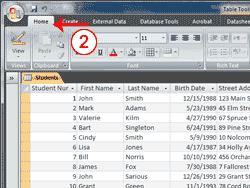
- Activate the Home tab.
- Click the Filter button. A menu appears.
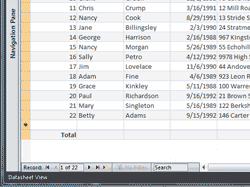
- Uncheck the items you do not want to appear, making sure only the items you want are checked.
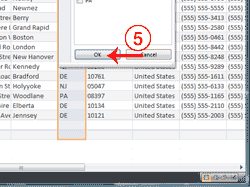
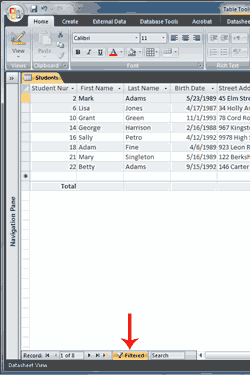
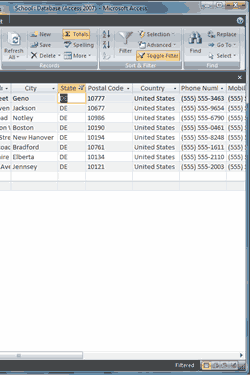
- Click OK. Access filters your data and displays the word Filtered at the bottom of the window.
 |  |
To remove a filter:
- Activate the Home tab.
- Click Advanced in the Sort & Filter group. A menu appears.
- Click Clear All Filters. Access clears all the filters you have applied.
Apply a Specialized Filter
In addition to simply searching for a specific value, you can apply several specialized filters. For example, you can find all of the records that do not equal the value you specify or you can find all of the records that fall between two dates. The following are lists of specialized filters.
Text Filters
| |
| Equals | Finds every record in the table where the field’s value equals the value you enter. |
| Does Not Equal | Finds every record in the table where the field’s value does not equal the value you enter. |
| Begins With | Finds every record in the table where the field’s value begins with the value you enter. |
| Does Not Begin With | Finds every record in the table where the field’s value does not begin with the value you enter. |
| Contains | Finds every record in the table where the field’s value contains the value you enter. |
| Does Not Contain | Finds every record in the table where the field’s value does not contain the value you enter. |
| Ends With | Finds every record in the table where the field’s value ends with the value you enter. |
| Does Not End With | Finds every record in the table where the field’s value does not end with the value you enter. |
Number Filters
| |
| Equals | Finds every record in the table where the field’s value equals the value you enter. |
| Does Not Equal | Finds every record in the table where the field’s value does not equal the value you enter. |
| Less Than | Finds every record in the table where the field’s value is less than the value you enter. |
| Greater Than | Finds every record in the table where the field’s value is greater than the value you enter. |
| Between | Finds every record in the table where the field’s value is between the values you enter. |
Date Filters
| |
| Equals | Finds every record in the table where the field’s value equals the date you enter. |
| Does Not Equal | Finds every record in the table where the field’s value does not equal the date you enter. |
| Before | Finds every record in the table where the field’s value is before the date you enter. |
| Greater Than | Finds every record in the table where the field’s value is greater than (comes after) the date you enter. |
| Between | Finds every record in the table where the field’s date is between the dates you enter. |
| All Dates in a Period | Finds every record in the table where the field’s date is in the period you enter. |
To apply a specialized filter:
 |
 |
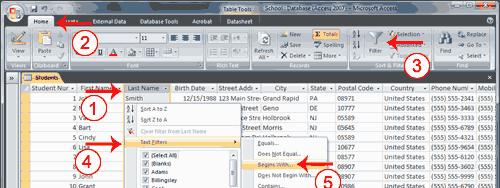
- Click the Last Name column label.
- Activate the Home tab.
- Click the Filter button. A menu appears.
- Click the Text Filters option. A menu appears.
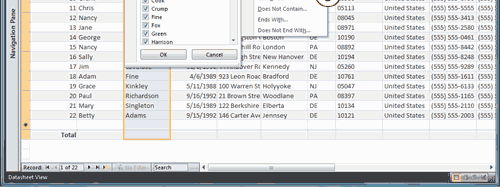
- Click the option you want. A Custom Filter dialog box appears.

- Enter the appropriate information.
- Click OK. Access filters your data and displays the word Filtered at the bottom of the window.
Hide Columns
There may be times when you may not want to display a certain column or set of columns. In such cases, you can temporarily hide the column or columns from view. Later, if you want to display them column again, you can unhide them.
To hide columns:
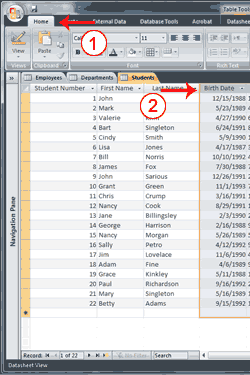 | 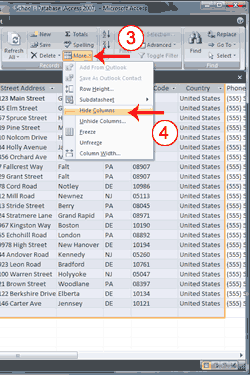 |
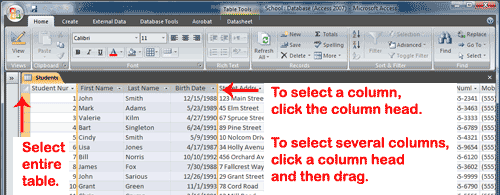
- Select the columns you want to hide.
- Activate the Home tab.
- Click the More button in the Records group. A menu appears.
- Click Hide Columns. Access hides the columns you selected.
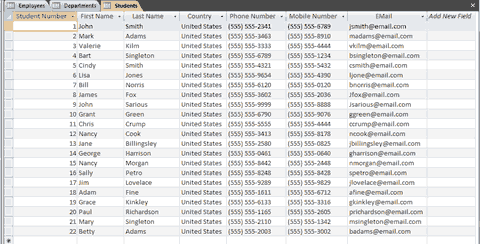
In the figure, the Birth Date, Street Address, City, State, and Zip fields are hidden.
Or
- Select the columns you want to hide.
- Right-click. A menu appears.
- Click Hide Columns.
To unhide columns:
- Activate the Home tab.
- Click the More button in the Records group. A menu appears.
- Click Unhide Columns. The Unique Columns dialog box appears.
- Select the column you want to display.
- Click Close. Access displays the columns you chose.
or
- Right-click any column label. A menu appears.
- Click Unhide columns.
- Select the columns you want to display.
- Click the Close button. Access displays the columns you selected.
Freeze Columns
If your table has a large number of columns, you may want to freeze columns so the frozen columns stay in view as you scroll across the page. For example, if you have a Students table and you want the Student Number, First Name, and Last Name to remain onscreen as you scroll across the table, you can freeze the Student Number, First Name, and Last Name fields. When you freeze a column, Access moves it to the far left side of your table. If you want it to remain there, you must save the table.
To freeze columns:
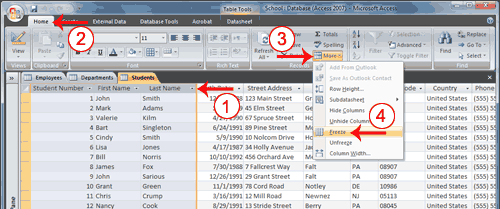
- Select the columns you want to freeze.
- Activate the Home tab.
- Click the More button in the Records group. A menu appears.
- Click Freeze. Access freezes the columns. As you scroll, the frozen columns remain stationary.
To unfreeze columns:
- Activate the Home tab.
- Click the More button in the Records group. A menu appears.
- Click Unfreeze. Access unfreezes the columns.
Format a Table
You can use the features in the Font group on the Home tab to apply a variety of formats to your table.
Format a Table | |
Button
|
Function
|
Apply a font to all of the data in a table.
| |
Apply a font size to all of the data in a table.
| |
Bold all of the data in a table.
| |
Italicize all of the data in a table.
| |
Underline all of the data in a table.
| |
Left-align a column.
| |
Right-align a column.
| |
Center a column.
| |
Change the font color.
| |
Change the background color. By default, the background color is white.
| |
Change the gridlines. Gridlines separate columns and rows. This option allows you to display gridlines for columns only (vertical), gridlines for rows only (horizontal), gridlines for both columns and rows, or no gridlines at all.
| |
Change the alternating color. For example, on a datasheet you can have every other row appear in an alternating color.
| |
To bold, italicize, or underline:
- Place the cursor anywhere within the table.
- Activate the Home tab.
- Click the button for the format you want to apply. Access applies the format.
To left-align, right-align, or center:
- Place the cursor anywhere within the column you want to left-align, right-align, or center.
- Activate the Home tab.
- Click the button for the format you want to apply. Access applies the format.
To change the font, font size, or gridlines:
- Place the cursor anywhere within the table.
- Activate the Home tab.
- Click the down-arrow to the right of the option you want to apply. A menu appears.
- Select the option you want. Access changes the font, font size, or gridlines.
To change the font color, background color, or alternating color:
- Place the cursor anywhere within the table.
- Activate the Home tab.
- Click the down-arrow to the right of the option you want to apply. A menu of colors appears.
- Select the color you want. Access changes the font color or the alternating color.
Compute Totals
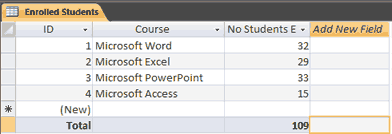
On the Home tab, you can use the Total button in the Records group to compute the sum, average, count, minimum, maximum, standard deviation, or variance of a number field; the count, average, maximum, or minimum of a date field; or the count of a text field.
To compute totals:
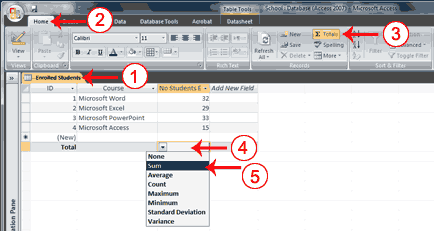
- Open the table or query for which you want to compute totals.
- Activate the Home tab.
- Click the Totals button in the Records group. A Total line appears at the bottom of the table or query.
- Click on the Total line under the column you want to total. A down-arrow appears on the left side of the field.
- Click the down-arrow and then choose the function you want to perform. Access performs the calculation and displays the results in the proper column on the Totals row.
Find and Replace
If you need to find a sequence of characters, a word, or a phrase in a table or field, you can use the Find command. In Access, the Find command has three options: You can find all instances in a table or field that match a sequence of characters, all instances that begin with a sequence of characters, or all instances that contain a sequence of characters. For example, you can find all students with the last name Smith, all students whose last name begins with S, or all instances of 08 anywhere in the field.
After you find the word, phrase, or sequence of characters you are searching for, you can replace it with a new sequence of characters by executing the Replace command.
To do a Find:

- Place your cursor in the column you want to search.
- Activate the Home tab.
- Click the Find button in the Find group. The Find and Replace dialog box appears.
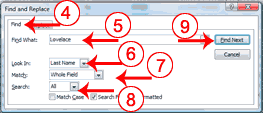
- Activate the Find tab.
- Type what you want to find in the Find What field.
- Choose the name of the table you want to search in the Look In field if you want to search the entire table or select the field you selected in step 1 if you want to search that field. If you want to search another field, click in that field and then select it in the Look In field.
- Choose Any Part Of Field if you want to search for your entry anywhere within a field, choose Whole Field if you want the field to match the sequence of characters you entered, or choose Start Of Field if you want the field to begin with a sequence of characters you entered.
- Choose All in the Search field if you want to search the entire table, Up to search upward from your current location, or Down to search downward from your current location.
- Click Find Next to begin your search. Access finds the first entry that matches your find criteria. Continue clicking Find Next to find additional matches.
Create Relationships
In Access, you store data in multiple tables and then use relationships to join the tables. After you have created relationships, you can use data from all of the related tables in a query, form, or report.
A primary key is a field or combination of fields that uniquely identify each record in a table. A foreign key is a value in one table that must match the primary key in another table. You use primary keys and foreign keys to join tables together—in other words, you use primary keys and foreign keys to create relationships.
There are two valid types of relationships: one-to-one and one-to-many. In a one-to-one relationship, for every occurrence of a value in table A, there can only be one matching occurrence of that value in table B, and for every occurrence of a value in table B, there can only be one matching occurrence of that value in table A. One-to-one relationships are rare because if there is a one-to-one relationship, the data is usually stored in a single table. However, a one-to-one relationship can occur when you want to store the information in a separate table for security reasons, when tables have a large number of fields, or for other reasons. In a one-to-many relationship, for every occurrence of a value in table A, there can be zero or more matching occurrences in table B, and for every one occurrence in table B, there can only be one matching occurrence in table A.
When tables have a one-to-many relationship, the table with the one value is called the primary table and the table with the many values is called the related table. Referential integrity ensures that the validity of the relationship between two tables remains intact. It prohibits changes to the primary table that would invalidate an entry in the related table. For example, a school has students. Each student can make several payments, but each payment can only be from one student. The Students table is the primary table and the Payments table is the related table.
Students
| ||
Student ID
|
Last Name
|
First Name
|
Primary Key
| ||
1
|
John
|
Smith
|
2
|
Mark
|
Adams
|
3
|
Valerie
|
Kilm
|
Payments
| |||
Payment ID
|
Student ID
|
Amount Due
|
Amount Paid
|
Primary key
|
Foreign key
| ||
1
|
1
|
500
|
500
|
2
|
2
|
700
|
300
|
3
|
3
|
500
|
250
|
4
|
2
|
400
|
300
|
5
|
3
|
250
|
250
|
If you delete Student ID 1 from the Students table, Student ID 1 is no longer valid in the Payments table. Referential integrity prevents you from deleting Student ID 1 from the Students table. Also, if the only valid Student IDs are 1, 2, and 3, referential integrity prevents you from entering a value of 4 in the Student ID field in the Payments table. A foreign key without a primary key reference is called an orphan. Referential integrity prevents you from creating orphans.
To create relationships:
- Close all tables and forms. (Right-click on the tab of any Object. A menu appears. Click Close All.)
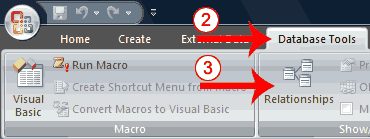
- Activate the Database Tools tab.
- Click the Relationships button in the Show/Hide group. The Relationships window appears.

- If anything appears in the relationships window, click the Clear Layout button in the Tools group. If you are prompted, click Yes.
- Click the Show Table button in the Relationships group. The Show Table dialog box appears.
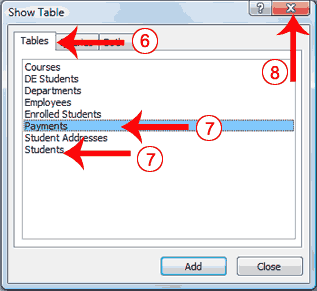
- Activate the Tables tab if your relationships will be based on tables, activate the Queries tab if your relationships will be based on queries, or activate the Both tab if your relationships will be based on both.
- Double-click each table or query you want to use to build a relationship. The tables appear in the Relationships window.
- Click the Close button to close the Show Table dialog box.
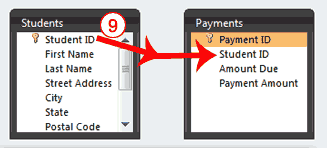
- Drag the Primary table’s primary key over the related table’s foreign key. After you drag the primary key to the related table’s box, the cursor changes to an arrow. Make sure the arrow points to the foreign key. The Edit Relationships Dialog box appears.
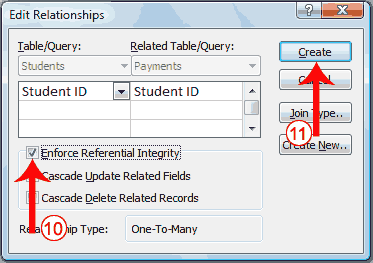
- Click the Enforce Referential Integrity checkbox.
- Click Create. Access creates a one-to-many relationship between the tables.
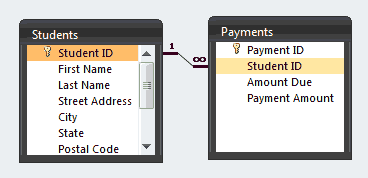
- Click the Save button on the Quick Access toolbar to save the relationship.
- Click the line that connects the tables.
- Press the Delete key.

