Lesson 2: Creating Microsoft Access Tables
Tables are the foundation of an Access database. Access stores data in tables. This lesson teaches you how to create a table, add fields to a table, assign data types to fields, and set field properties.
Understanding Tables
A table is a set of columns and rows. Each column is called a field. Within a table, each field must be given a name and no two fields can have the same name. Each value in a field represents a single category of data. For example, a table might have three fields: Last Name, First Name, and Phone Number. The table consists of three columns: one for last name, one for first name, and one for phone number. In every row of the table, the Last Name field contains the last name, the First Name field contains the first name, and the Phone Number field contains the phone number. Each row in a table is called a record.
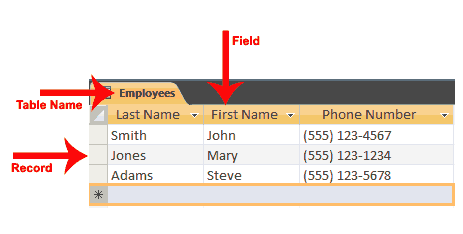
All of the data in a table should refer to the same subject. For example, all of the data in the Employees table should refer to employees, all of the data in the Students table should refer to students, and all of the data in the Courses table should refer to courses.
You can view an Access database as a collection of related tables. For example, in a database that contains tables for Employees, Students, and Courses, the Employees table lists the employees, the Students table lists students, and the Courses table lists the courses students can take.
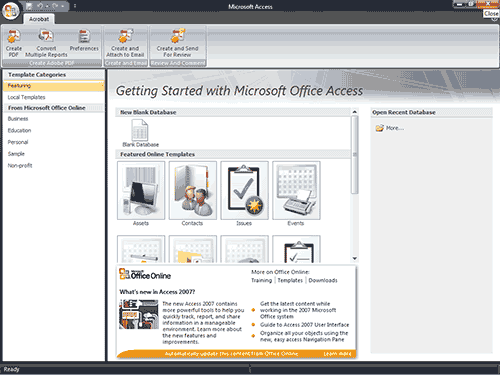
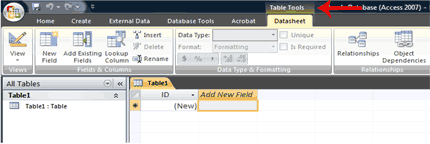
After Access creates a blank database, it opens in Datasheet view and makes available the tools you need to create a table. Datasheet view displays a table as a set of columns and rows. When you view a blank database for the first time in Datasheet view, you see a column named ID. This column is by default the primary key field.
A primary key is a field or combination of fields that uniquely identify each record in a table. No two records in a table should have the same values in every field. For example, the following should not occur in a table.
| Last Name | First Name | City |
| Smith | John | Jonestown |
| Smith | John | Jonestown |
In the real world, it is possible to have two people from the same city with the same first and last name. In cases like this, you can use the ID field as the primary key field and use it to make each record unique. The ID field has a data type of AutoNumber; as a result, Access automatically creates a unique number for each record in the database. The resulting table will look like the one shown here.
| ID | Last Name | First Name | City |
| 1 | Smith | John | Jonestown |
| 2 | Smith | John | Jonestown |
Access provides several methods for creating a table. One method is to use the Rename option with the Add New Field column label to give each column the field name you want it to have and then to type or paste your data into the table. Field names can include letters, numbers, and spaces and can be up to 64 characters long. When choosing a field name, try to keep it short.
When you save your table for the first time, Access gives you the opportunity to name your table. Each table name must be unique; hence, two tables in the same database cannot have the same name. The table name should describe the data in the table; can consist of letters, numbers, and spaces; and can be up to 64 characters long. When choosing a table name, try to keep it short.
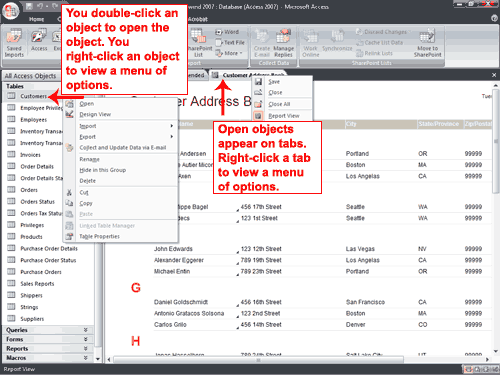
You can save a table by clicking the Save button on the Quick Access toolbar or by right-clicking the Tables tab and then choosing Save from the menu that appears.
To add fields to a table:
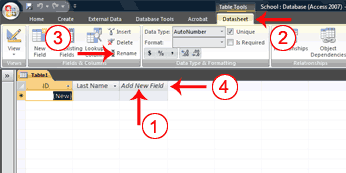
- Click the Add New Field column label.
- Activate the Datasheet tab.
- Click Rename in the Fields & Columns group.
- Type the field name.
- Press Enter. Access creates the field.
- Type the next field name. Access creates the field. Continue until you have created all of the fields in your table.
- Press Enter without entering a field name to end your entries.
Or
- Right-click the Add New Field column label. A menu appears.
- Click Rename Column.
- Type the field name.
- Press Enter. Access creates the field.
- Type the next field name. Access creates the field. Continue until you have created all of the fields in your table.
Name and Save a Table
After you create a table, you must name and save it.
To name and save a table:
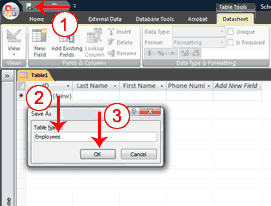
- Click the Save button on the Quick Access toolbar. The Save As dialog box appears.
- Type the name you want to give your table.
- Click OK. Access names your table.
Understanding Data Types
In Access, you use data types to specify the type of data each field can capture. A field with a data type of text can store alphabetic characters and numbers. Generally speaking, you cannot perform mathematical calculations by using a text field. For example, you can use a text field to store a street address. Unless you do some manipulation, you cannot use the numbers in the street address in mathematical calculations. You will not be able to sum or average the numbers in an address field, which is fine, because you probably do not want to. Alternatively, you can assign a Test Score field a data type of Number. You can enter numbers into the field and then average, sum, or perform other calculations with the numbers. However, you cannot enter an alphabetic character in a number field.
Data Types | ||
| Data Type | Use | Notes |
| Text | Alphanumeric data. Use for text and for numbers that are not used in mathematical calculations. Use for names, addresses, and other relatively short pieces of text. Can store up to 255 characters. | . |
| Memo | Long text. Use for long pieces of text, such as notes and long descriptions. Can store up to 64,000 characters. | |
| Number | Numeric data. Use for numbers you want to use in mathematical calculations. | If you are working with currency, use the currency type. |
| Date/Time | Use for dates and times. | |
| Currency | Use for currency. | Prevents rounding during calculation. |
| AutoNumber | Unique sequential numbers or random numbers automatically inserted when you create a record. Use to create a primary key. | |
| Yes/No | Logical data. Use when only one of two values is valid. Yes/No, True/False, etc. | |
| Hyperlink | Use to store hyperlinks. | |
| Attachment | Use to store attachments. | |
| OLE Object | Use to attach an OLE object such as a Word document, Excel spreadsheet, or PowerPoint presentation. | |
After you create the fields for a table, you can enter data by typing in each field. As you type, Access assigns a data type to each field based on your entry.
Assigned Data Types | |
| Sample Entry | Data Type Assigned |
| Smith | Text |
| http://www.website.com | Hyperlink |
| 10000 | Number, Long Integer |
| 10,000 | Number, Long Integer |
| 10,000.99 | Number, Double |
| 10000.999 | Number, Double |
| 01/01/2009 The date and time formats recognized are those of your user locale. | Date/Time |
| January 1, 2009 | Date/Time |
| 12:10:33 | Date/Time |
| 12:30 am | Date/Time |
| 16:50 | Date/Time |
| 100.50 | Number, Double |
| 25.00% | Number, Double |
| 1.23E+02 | Number, Double |
Explicitly Assign Data Types and Formats
You may want to change the data type Access assigned to a field, or you may want to explicitly assign a data type to each field. You can do so by choosing the Datasheet tab and then selecting the proper option in the Data Type field in the Data Type & Formatting group.
Some data types allow you to select the formatting you want. By formatting, you determine how data in a field displays. For example, if you choose a data type of number and a format of Euro, any number you enter will appear with a Euro sign in front.
Windows regional settings enable you to display information such as dates, times, and currency that match the standards or language used in the country in which you live. For example, if you live in the United States, the currency setting uses a dollar sign.
| Regional Settings for English (United States) | |
| Number | 123,456,789.00 |
| Currency | $123,456,789.00 |
| Time | 3:39:44 PM |
| Short Date | 7/28/2008 |
| Long Date | Monday, July 28, 2008 |
Use the Windows Control panel’s Regional and Language options to view or change regional settings.
Data Types | ||
| Data Type | Format | How Numbers Display |
| Number | General Number | As typed. |
| Currency | Uses thousands separator. Follows regional settings. | |
| Euro | Uses currency format with Euro symbol. | |
| Fixed | Displays at least one digit. Follows regional settings. | |
| Standard | Uses thousands separator. Follows regional setting. | |
| Percent | Converts entry to percent. | |
| Scientific | Uses scientific notation. | |
| Currency | General Number | As typed. |
| Currency | Uses thousands separator. Follows regional settings. | |
| Euro | Uses currency format with Euro symbol. | |
| Fixed | Displays at least one digit. Follows regional settings. | |
| Standard | Uses thousands separator. Follows regional setting. | |
| Percent | Converts entry to percent. | |
| Scientific | Uses scientific notation. | |
| Date/Time | General Date | Date values display as numbers and time values as hours, minutes, and seconds followed by AM or PM. Follows regional settings. |
| Long Date | Uses the Long Date format specified in your Windows regional settings. | |
| Medium Date | Uses dd/mmm/yy, using the date separator specified in your Windows regional settings. | |
| Short Date | Uses the Short Date format specified in your Windows regional settings. | |
| Long Time | Uses hours, minutes, and seconds followed by AM or PM. Uses the separator specified in the Time setting in your Windows regional settings. | |
| Medium Time | Displays hours and minutes followed by AM or PM. Uses the separator specified in the Time setting in your Windows regional settings. | |
| Short Time | Uses hours and minutes. Uses the separator specified in the Time setting in your Windows regional settings. | |
| Yes/No | Yes/No True/False On/Off | |
To explicitly assign a data type or format to a field:
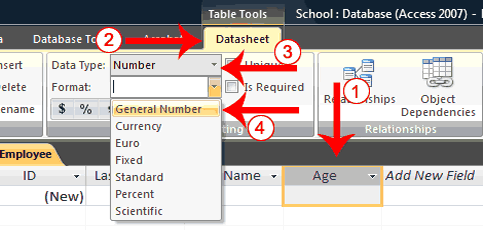
- Click the field label for the field to which you want to assign a data type.
- Activate the Datasheet tab.
- Click the down-arrow next to the Data Type field and then choose a data type.
- Click the down-arrow next to the Format field and then choose a format. Access assigns a data type and format to the field you selected.
Understanding Design View
Access provides several ways to view the objects in your database. You can use Design view to create or modify an Access table. You can use the View button on the Home tab or the Table Design button on the Create tab to change to Design view. Using Design view is the preferred method for creating a table because it provides you with the most options and enables you to precisely define your table. In addition to selecting a data type, you can set all of the following options in Design view.
Design View Options | ||
| Field Property | Data Type | Comments |
| Field Size | Text | Enables you to restrict the number of characters stored in a text field to 0 to 255 characters. The default is 255. |
| Number | Enables you to select the type of number stored in a field. | |
| Number Types | Values Stored | |
| Byte | 0 to 255. (No fractions) | |
| Decimal | –9.999... x 1027 through +9.999... x 1027 | |
| Integer | –32,768 to +32,767 (No fractions) | |
| Long Integer | –2,147,483,648 to +2,147,483,647 | |
| Single | –3.4 x 1038 to +3.4 x 1038 numeric floating point values. Up to seven significant digits. | |
| Double | –1.797 x 10308 to +1.797 x 10308 1038 numeric floating point values. Up to fifteen significant digits. | |
| Replication ID | Globally Unique Identifier (GUID). Used by Access to establish a unique identifier for replication. | |
| Format | Number | Determines how numbers display. When you use the currency, fixed, standard, and percent formats. Access follows the settings specified in Regional Settings in the Windows Control Panel for negative amounts, decimal and currency symbols, and decimal places. |
| Currency Number | General Number | Displays as typed. |
| Currency | Uses thousands separator. Follows regional setting. | |
| Euro | Uses currency format with Euro symbol. | |
| Fixed | Displays one digit. Follows regional settings. | |
| Standard | Uses thousands separator. Follows regional settings. | |
| Percent | Converts entry to percent. | |
| Scientific | Uses scientific notation. | |
| Date/Time | General Date | Displays date and time. Example: 01/02/99, 06:28:21 PM |
| Long Date | Displays Day of Week and Date: Example: Saturday, January 02, 1999 | |
| Medium Date | Example: 02-Jan-99 | |
| Short Date | Example: 01/02/99 | |
| Long Time | Example: 6:28:21 PM | |
| Medium Time | Example: 6:28 PM | |
| Short Time | Example: 18:28 | |
| Text and Memo | @ | Text character required. |
| & | Text character not required. | |
| < | Changes all characters to lowercase. | |
| > | Changes all characters to uppercase. | |
| Yes/No | Yes/No | If the Lookup Display Control is a text box, displays Yes/No. |
| True/False | If the Lookup Display Control is a text box, displays True/False. | |
| On/Off | If the Lookup Display Control is a text box, displays On/Off. | |
| Decimal Places | Determines number of decimal places Access displays. | Auto. Number of decimals displayed depends on the format setting. |
| 0–15. Used with format property. Determines the number of digits that display to the right of the decimal point. | ||
| Input Mask | Special characters used to control the values the user can input. | |
| Caption | Field name displayed on forms. | |
| Default Value | Sets the value that appears in the field by default when a record is created. | |
| Validation Rule | Sets the requirements for user input. | |
| Validation Text | Text for error messages that are sent when validation rules are broken. | |
| Required | Specifies whether the field is required or not. | Yes: Required No: Not Required |
| Allow Zero Length | Determines whether a zero-length field is a valid entry. | Yes: Is valid No: Not valid |
| Index | Specifies whether an index should be created in a field. Indexes speed up queries. | Yes: Create index. No: Do not create index. |
To use Design view to create a new table:
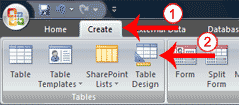
- Activate the Create tab.
- Click Table Design in the Tables group. Access changes to Design view and the Table Tools become available.
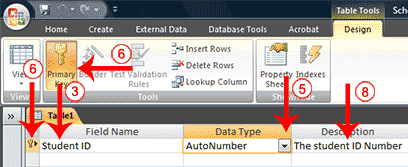
- Type the first field name in the Field Name field.
- Press the Tab key.
- Click the down-arrow that appears when you click in the Data Type field and then select a data type.
- Click Primary Key if the column you created is a primary key. A small key appears next to the field name.
- Press the Tab key.
- Type a description. The description is optional.
- Press the Tab key. Access moves to the Field Name field.
- Repeat steps 3 through 10 until you have created all of your fields.
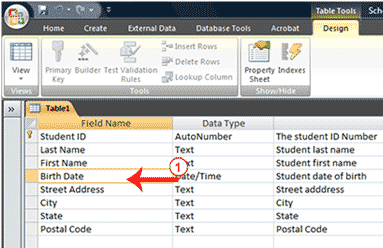
To set field properties:
 |
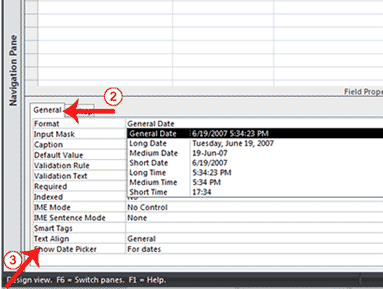 |
- Click the field for which you want to set the field properties.
- Activate the General tab in the Field Properties area.
- Set the properties you want to set.
- Repeat steps 1 through 3 until you have set all the properties for all fields.
You can use Design view to create or modify a table. After you finish the task, you must save the table by clicking the Save button on the Quick Access toolbar.
- Click the Save button on the Quick Access toolbar. Access saves the table unless you are saving for the first time. If you are saving for the first time, the Save As dialog box appears.
- Type the name you want to give your table.
- Click OK. Access saves the table. You can now access the table by using the Navigation pane.
Views are different ways of looking at the same object. Tables have four views: Datasheet view, Pivot Table view, Pivot Chart view, and Design view. You use Datasheet view to create a table, edit data, or view data; Pivot Table view to create a pivot table; Pivot Chart view to create a pivot chart; and Design view to create a table or modify an existing table.
To change the view:
- Activate the Home tab.
- Click the down-arrow under the View button. A menu appears.
- Click the view you want. Access changes to the view you chose.
- Activate the Create tab.
- Click the Table Templates button in the Tables group. A menu appears.
- Click the template you want to use. Access creates a table based on the template.
Create a Lookup Column
If a field can contain a finite list of values, you can create a Lookup Column and users can select the value they want from a list. For example, if the employees at a school can only work in one of the following departments: Administration, Computer Science, English, History, or Math. You can create a table Departments table that lists the departments and then use the list in the Employee table to assign each employee to a department.
Departments | |
| Department ID | Department |
| Primary Key | |
| 1 | Administration |
| 2 | Computer Science |
| 3 | English |
| 4 | History |
| 5 | Math |
Access has a wizard to help you create lookup columns. Creating a Lookup column creates a relationship between two tables. See the section Create Relationships in Lesson 3 to learn more about relationships.
To use the Lookup Wizard to create a lookup column:
Open the Lookup Wizard
 |
 |
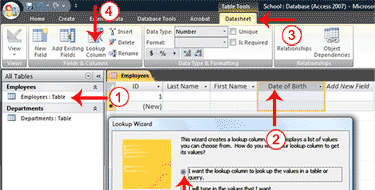
- Open the table to which you want to add a lookup column.
- Click the field label for the field before which you want to add a lookup column.
- Activate the Datasheet tab. (You must be in Datasheet view.)
- Click the Lookup Column button in the Fields & Columns group. The Lookup Wizard appears.
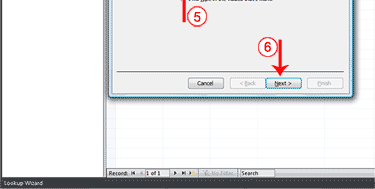
- Make sure the radio button next to “I want the lookup column to look up the values in a table or query.” is selected.
- Click Next. The Lookup Wizard moves to the next page.
Select your table or query
A lookup column can be based on a table, a query, or a list of values you type. If you base your lookup column on a table or query, you must create the table or query before creating the lookup column. A query is a list of rows and columns based on one or more tables. A query only displays the rows and columns you specify.
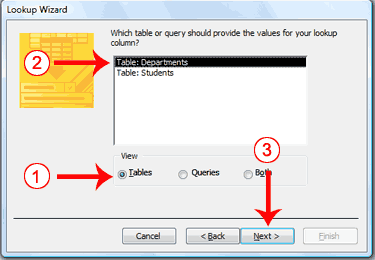
- Click a radio button to select what you want to base your lookup column on. Choose from Tables, Queries, or Both.
- Click to select the table or query you want.
- Click Next. The Lookup Wizard moves to the next page.
Select fields
You choose the fields you want to appear in your lookup column. Be sure to include the primary key.
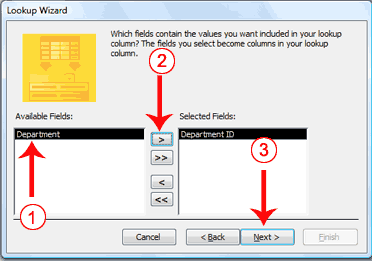
- Click the field you want.
- Click the single right-arrow button . Access places the field in the Selected Fields column. Repeat this process to select additional fields. If you want all the fields in the table, click the double right-arrow button . Note: Use the single left-arrow and the double left-arrows to deselect fields.
- Click Next. The Lookup Wizard moves to the next page.
Sort fields
The Lookup Wizard allows you to sort the records in a lookup column. You can display records in order, either ascending (alphabetical from A to Z, lowest number to highest number, earliest date to latest date) or descending (alphabetical from Z to A, highest number to lowest number, latest date to earliest date). You can also sort within a sort. For example, you can sort by state and then within each state by city, and then within each city by street address. If you are creating a sort within a sort, create the highest level sort on line one, the next level sort on line two, and so on. In the state, city, and street address example, you create the state on line one, the city on line two, and the street address on line three.
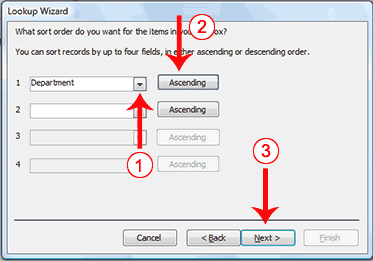
- Click the down-arrow and then select the field you want to sort by.
- Click to select a sort direction (the button toggles between ascending and descending). You can sort within a sort for up to four levels.
- Click Next. The Lookup Wizard moves to the next page.
Adjust column widths
A key column is the column that connects one table or query to another table or query. For example, you can use the Department ID field in the Employees table and the Department ID field in the Departments table to connect the two tables. You may, however, want to display the name of the department when you view the table but not the department ID; if so, leave the Hide Key Column box checked.
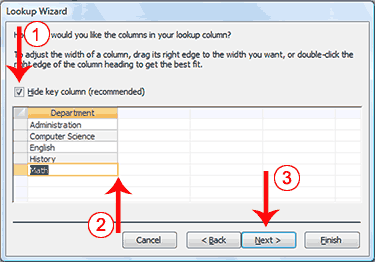
- Deselect Hide Key Column, if you wish.
- Adjust the column widths by dragging or double-clicking the right vertical border for the column.
- Click Next. The Lookup Wizard moves to the next page.
Specify the Key Field (if you deselected Hide Key Column)
A key field is a field that uniquely identifies a record. If you deselected Hide Key column, you must tell Access which field is the key field.
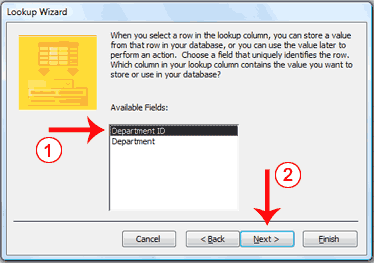
- Click the key field.
- Click Next. The Lookup Wizard moves to the next page.
Name the column
Field names appear at the top of each column. On this page of the Wizard you tell Access what you want to name your lookup column. In Access 2007, multiple values can appear in a field; click the Allow Multiple Values checkbox if you want to allow multiple values.
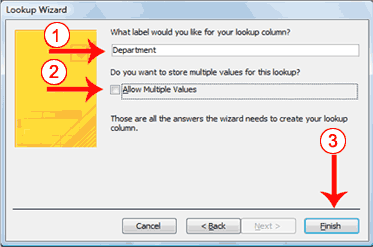
- Type the name you want to give the column.
- Click if you want to allow multiple values in the field.
- Click Finish. Access creates the lookup column.
- Activate the Datasheet tab. (These instructions assume you are in the Datasheet view.)
- Click the Lookup Column button in the Fields & Columns group. The Lookup Wizard appears.
- Click the radio button next to “I will type the values I want.”
- Click Next. The Lookup Wizard moves to the next page.
- Type the number of Columns you want in the Number Of Columns field.
- Type the values you want under the column heading.
- Click Next. The Lookup Wizard moves to the next page.
- Type the column label you want.
- Click Finish. Access creates a lookup column based on your list.

